Editor – This is the fifth in a series of blog posts about nginScript. The first post discusses why NGINX, Inc. developed its own implementation of JavaScript, and presents a sample use case. The subsequent posts explore additional use cases:
- Introduction to nginScript
- Using nginScript to Progressively Transition Clients to a New Server
- Advanced Logging with nginScript in "Scaling MySQL with TCP Load Balancing and Galera Cluster"
- Data Masking for User Privacy with nginScript
- Load Balancing MQTT with nginScript for Session Persistence in "NGINX Plus for the IoT: Load Balancing MQTT"
- Using Client Certificates to Authenticate MQTT Clients in "NGINX Plus for the IoT: Encrypting and Authenticating MQTT Traffic"
When it comes to the busiest websites on the Internet, NGINX and NGINX Plus dominate the market. In fact, NGINX powers over 50% of the top 1000, top 10,000, and top 100,000 sites. Its ability to handle over 1 million concurrent connections on a single server has driven its adoption by “hyperscale” sites and apps such as Airbnb, Netflix, and Uber.
Although NGINX Plus is most commonly known as a web server, HTTP reverse proxy, and load balancer, it is also a fully featured application delivery controller (ADC) with support for TCP and UDP applications. Its event‑driven architecture and all of the other attributes that have made it successful for HTTP use cases are equally applicable to the Internet of Things (IoT).
In this article we show how NGINX Plus can be used to load balance MQTT traffic. MQTT was originally published in 1999 for communication with remote oil fields. It was updated for IoT use cases in 2013 and has since become the protocol of choice for many IoT deployments. Production IoT deployments with millions of devices demand high performance and advanced functionality from a load balancer, and in this two‑part series of blog posts we will discuss the following advanced use cases.
- Load balancing MQTT traffic (this post)
- Encrypting and authenticating MQTT traffic
The Test Environment
To explore the features of NGINX Plus we will use a simple test environment that represents the key components of an IoT environment with a cluster of MQTT brokers. The MQTT brokers in this environment are HiveMQ instances running inside Docker containers.
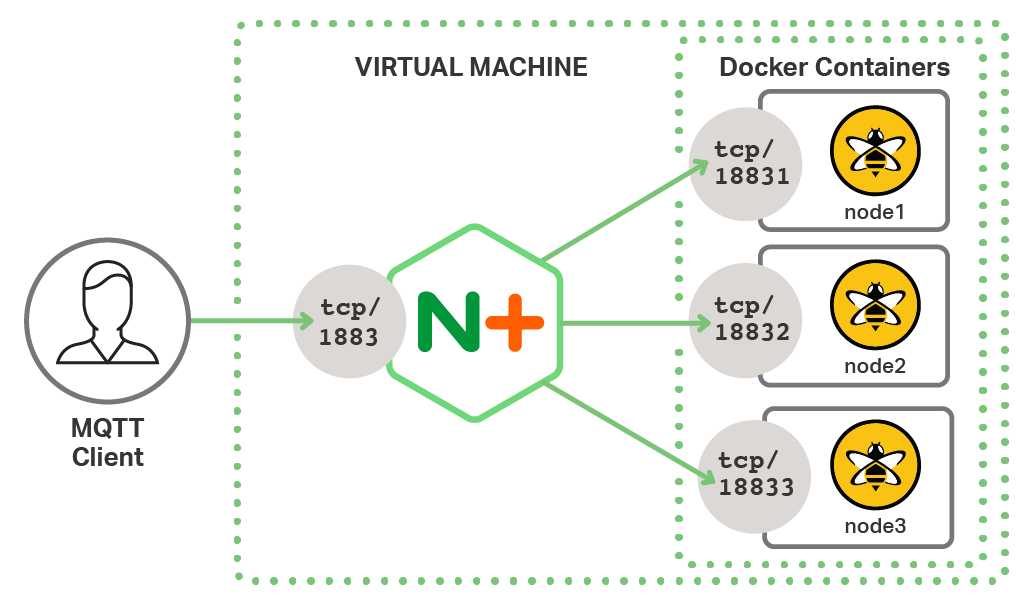
NGINX Plus acts as a reverse proxy and load balancer for the MQTT broker, listening on the default MQTT port of 1883. This provides a simple and consistent interface to the client, while the backend MQTT nodes can be scaled out (and even taken offline) without affecting the client in any way. We use the Mosquitto command line tool as the client, which represents the IoT devices in the test environment.
All use cases in this post and Part 2 use this test environment, and all of the configs apply directly to the architecture shown in the figure. For complete instructions on building the test environment, see Appendix 1.
Load Balancing MQTT with Active Health Checks for High Availability
A primary function of a load balancer is to provide high availability for the application so that backend servers can be added, removed, or go offline without affecting the client. Inherent to doing this reliably are health checks that proactively probe each of the backend servers for their availability. With active health checks, NGINX Plus can remove failed servers from the load‑balancing group before actual client requests reach them.
The usefulness of a health check depends on how accurately it simulates real application traffic and analyzes the response. Simple server liveness checks such as a ping do not ensure that the backend service is running. TCP port‑open checks do not ensure that the application itself is healthy. Here we configure basic load balancing for the test environment with a health check that ensures that each backend server is able to accept new MQTT connections.
We’re making changes in two configuration files.
In the main nginx.conf file, we include the following stream block and include directive to have NGINX Plus read in the configuration for TCP load balancing from one or more files in the stream_conf.d subdirectory, which is in the same directory as nginx.conf. We do this instead of including the actual configuration in nginx.conf.
Then in the same directory as nginx.conf we create the directory stream_conf.d to contain our TCP and UDP configuration files. Note that we do not use the pre‑existing conf.d directory because by default it is reserved for the http configuration context and so adding stream configuration there will fail.
In stream_mqtt_healthcheck.conf we first define the access log format for MQTT traffic (lines 1–2). This is deliberately similar to the HTTP common log format so that the resulting logs can be imported into log‑analysis tools.
Next we define the upstream group called hive_mq (lines 4–9) which contains three MQTT servers. In our test environment they are each accessible on localhost with a unique port number. The zone directive defines an amount of memory that is shared across all of the NGINX Plus worker processes to maintain load‑balancing state and health information.
The match block (lines 11–15) defines the health check used to test the availability of MQTT servers. The send directive is a hexadecimal representation of a complete MQTT CONNECT packet with a Client identifier (ClientId) of nginx health check. This is sent to each of the servers defined in the upstream group whenever the health check fires. The corresponding expect directive describes the response that the server must return for NGINX Plus to consider it healthy. Here, the 4‑byte hexadecimal string 20 02 00 00 is a complete MQTT CONNACK packet. Receipt of this packet demonstrates that the MQTT server is capable of receiving new client connections.
The server block (lines 17–25) configures how NGINX Plus deals with clients. NGINX Plus listens on the default MQTT port, 1883, and forwards all traffic to the hive_mq upstream group (line 19). The health_check directive specifies that health checks are performed against the upstream group (at the default frequency of five seconds) and that the check defined by the mqtt_conn match block is used.
Verifying the Configuration
To test that this basic configuration is working, we can use the Mosquitto client to publish some test data to our test environment.
$ mosquitto_pub -d -h mqtt.example.com -t "topic/test" -m "test123" -i "thing001"
Client thing001 sending CONNECT
Client thing001 received CONNACK
Client thing001 sending PUBLISH (d0, q0, r0, m1, 'topic/test', ... (7 bytes))
Client thing001 sending DISCONNECT
$ tail --lines=1 /var/log/nginx/mqtt_access.log
192.168.91.1 [23/Mar/2017:11:41:56 +0000] TCP 200 23 4 127.0.0.1:18831
The line from the access log shows that NGINX Plus received a total of 23 bytes and 4 bytes were sent to the client (the CONNACK packet). We can also see that MQTT node1 was chosen (port 18831). As shown by the following lines from the access log, when we repeat the test, the default Round Robin load‑balancing algorithm selects node1, node2, and node3 in turn.
$ tail --lines=4 /var/log/nginx/mqtt_access.log
192.168.91.1 [23/Mar/2017:11:41:56 +0000] TCP 200 23 4 127.0.0.1:18831
192.168.91.1 [23/Mar/2017:11:42:26 +0000] TCP 200 23 4 127.0.0.1:18832
192.168.91.1 [23/Mar/2017:11:42:27 +0000] TCP 200 23 4 127.0.0.1:18833
192.168.91.1 [23/Mar/2017:11:42:28 +0000] TCP 200 23 4 127.0.0.1:18831
Load Balancing MQTT with nginScript for Session Persistence
Round Robin load balancing is an effective mechanism for distributing client connections across a group of servers. However, there are several reasons why it is not ideal for MQTT connections.
MQTT servers often expect a long‑lived connection between client and server and a great deal of session state can be built up on the server. Unfortunately, the nature of IoT devices and the IP networks they use means that connections get broken, forcing some clients to frequently reconnect. NGINX Plus can use its Hash load‑balancing algorithm to select an MQTT server based on the client IP address. Simply adding hash $remote_addr; to the upstream block enables session persistence so that each time a new connection comes in from a given client IP address, the same MQTT server is selected.
But we cannot rely on IoT devices to reconnect from the same IP address, especially if they are using cellular networks (for example, GSM or LTE). To ensure that the same client reconnects to the same MQTT server we must use the MQTT Client identifier as the key to the hashing algorithm.
Session Persistence Based on the MQTT ClientId
The MQTT ClientId is a mandatory element of the initial CONNECT packet, which means that it is available to NGINX Plus before the packet is proxied to the upstream server. We can use nginScript to parse the CONNECT packet and extract the ClientId as a variable that can then be used by the hash directive to implement MQTT‑specific session persistence.
nginScript is the “NGINX native” programmatic configuration language. It is a unique JavaScript implementation for NGINX and NGINX Plus, designed specifically for server‑side use cases and per‑request processing. It has three key characteristics that make it suitable for an implementation of session persistence for MQTT:
- nginScript is tightly integrated with NGINX Plus processing phases so that we can inspect client packets before they are load balanced to the upstream group.
- nginScript uses built‑in JavaScript methods for string and numerical processing, which enables efficient parsing of Layer 4 protocols. The actual parsing of the MQTT
CONNECTpacket requires less than 20 lines of code. - nginScript can create variables that are available to the NGINX Plus configuration.
For instructions on enabling nginScript, see Appendix 2.
NGINX Plus Configuration for Session Persistence
The NGINX Plus configuration for this use case remains relatively simple. The following config is a modified version of the example in Load Balancing with Active Health Checks, with health checks removed for brevity.
We begin by specifying the location of the nginScript code with the js_include directive. The js_set directive tells NGINX Plus to call the setClientId function when it needs to evaluate the $mqtt_client_id variable. We add more detail to the access log by appending this variable to the mqtt log format on line 5.
We enable session persistence on line 12 with the hash directive specifying $mqtt_client_id as the key. Notice that we use the consistent parameter so that if an upstream server fails, its share of the traffic is evenly distributed across the remaining servers without affecting sessions that are already established on those servers. Consistent hashing is discussed further in our blog post about sharding a web cache – the principles and benefits apply equally here.
The js_preread directive (line 18) specifies the nginScript function that is executed at the preread phase of request processing. The preread phase is triggered for every packet (in both directions) and occurs before proxying so that the value of $mqtt_client_id is available when it is needed in the upstream block.
nginScript Code for Session Persistence
We define the JavaScript for extracting the MQTT ClientId in the mqtt.js file, which is loaded by the js_include directive in the NGINX Plus configuration file (stream_mqtt_session_persistence.conf).
The primary function, getClientId(), is declared on line 4. It is passed the object called s, which represents the current TCP session. The session object has numerous properties, several of which are used in this function.
Lines 5–9 ensure that the current packet is the first to be received from the client. Subsequent client messages and server responses are ignored so that once a connection is established there is no additional overhead on the traffic flow.
Lines 10–26 examine the MQTT header to ensure that the packet is a CONNECT type and to determine where the MQTT payload begins.
Lines 27–31 extract the ClientId from the payload, storing the value in the JavaScript global variable client_id_str. This variable is then exported to the NGINX configuration with the setClientId function (lines 42–44).
Verifying Session Persistence
Now we can use the Mosquitto client again to test for session persistence by sending a series of MQTT publishing requests with three different ClientId values (the -i option).
$ mosquitto_pub -h mqtt.example.com -t "topic/test" -m "test123" -i "foo"
$ mosquitto_pub -h mqtt.example.com -t "topic/test" -m "test123" -i "bar"
$ mosquitto_pub -h mqtt.example.com -t "topic/test" -m "test123" -i "baz"
$ mosquitto_pub -h mqtt.example.com -t "topic/test" -m "test123" -i "foo"
$ mosquitto_pub -h mqtt.example.com -t "topic/test" -m "test123" -i "foo"
$ mosquitto_pub -h mqtt.example.com -t "topic/test" -m "test123" -i "foo"
$ mosquitto_pub -h mqtt.example.com -t "topic/test" -m "test123" -i "bar"
$ mosquitto_pub -h mqtt.example.com -t "topic/test" -m "test123" -i "bar"
$ mosquitto_pub -h mqtt.example.com -t "topic/test" -m "test123" -i "baz"
$ mosquitto_pub -h mqtt.example.com -t "topic/test" -m "test123" -i "baz"
Examining the access log shows that ClientId foo always connects to node1 (port 18831), ClientId bar always connects to node2 (port 18832) and ClientId baz always connects to node3 (port 18833).
$ tail /var/log/nginx/mqtt_access.log
192.168.91.1 [23/Mar/2017:12:24:24 +0000] TCP 200 23 4 127.0.0.1:18831 foo
192.168.91.1 [23/Mar/2017:12:24:28 +0000] TCP 200 23 4 127.0.0.1:18832 bar
192.168.91.1 [23/Mar/2017:12:24:32 +0000] TCP 200 23 4 127.0.0.1:18833 baz
192.168.91.1 [23/Mar/2017:12:24:35 +0000] TCP 200 23 4 127.0.0.1:18831 foo
192.168.91.1 [23/Mar/2017:12:24:37 +0000] TCP 200 23 4 127.0.0.1:18831 foo
192.168.91.1 [23/Mar/2017:12:24:38 +0000] TCP 200 23 4 127.0.0.1:18831 foo
192.168.91.1 [23/Mar/2017:12:24:42 +0000] TCP 200 23 4 127.0.0.1:18832 bar
192.168.91.1 [23/Mar/2017:12:24:44 +0000] TCP 200 23 4 127.0.0.1:18832 bar
192.168.91.1 [23/Mar/2017:12:24:47 +0000] TCP 200 23 4 127.0.0.1:18833 baz
192.168.91.1 [23/Mar/2017:12:24:48 +0000] TCP 200 23 4 127.0.0.1:18833 baz
Notice that we also have the benefit of the MQTT ClientId appearing in the access log lines regardless of whether we use session persistence or any other load‑balancing algorithm.
Conclusion
In this first post of a two‑part series, we’ve demonstrated how NGINX Plus uses active health checks to improve the availability and reliability of IoT applications, and how nginScript can extend NGINX Plus by providing a Layer 7 load‑balancing capability like session persistence for TCP traffic. In the second post, we’ll explore how NGINX Plus can make your IoT applications more secure by offloading TLS termination and authenticating clients.
In combination with nginScript or on its own, NGINX Plus’ inherent high performance and efficiency make it ideal as a software load balancer for your IoT infrastructure.
To try nginScript with NGINX Plus, start your free 30‑day trial today or contact us for a demo.
Appendixes
Creating the Test Environment
We installed the test environment on a virtual machine so that it is isolated and repeatable. However, there is no reason why you cannot install it on a physical, “bare metal” server.
Installing NGINX Plus
See the instructions in the NGINX Plus Admin Guide.
Installing HiveMQ
Any MQTT server can be used but this test environment is based on HiveMQ (download here). In this example we install HiveMQ on a single host using Docker containers for each node. The following instructions are adapted from Deploying HiveMQ with Docker.
-
Create a Dockerfile for HiveMQ in the same directory as hivemq.zip.
-
Working in the directory that contains hivemq.zip and the Dockerfile, create the Docker image.
$ docker build -t hivemq:latest . -
Create three HiveMQ nodes, each exposed on a different port.
$ docker run -p 18831:1883 -d --name node1 hivemq:latest ff2c012c595a $ docker run -p 18832:1883 -d --name node2 hivemq:latest 47992b1f4910 $ docker run -p 18833:1883 -d --name node3 hivemq:latest 17303b900b64 -
Check that all three HiveMQ nodes are running. (In the following sample output, the
COMMAND,CREATED, andSTATUScolumns have been omitted for ease of reading.)$ docker ps CONTAINER ID IMAGE ... PORTS NAMES 17303b900b64 hivemq:latest ... 0.0.0.0:18833->1883/tcp node3 47992b1f4910 hivemq:latest ... 0.0.0.0:18832->1883/tcp node2 ff2c012c595a hivemq:latest ... 0.0.0.0:18831->1883/tcp node1
Installing Mosquitto
The Mosquitto command line client can be downloaded from the project website. Mac users with Homebrew installed can run the following command.
$ brew install mosquittoTest the Mosquitto client and HiveMQ installation by sending a simple publish message to one of the Docker images.
$ mosquitto_pub -d -h mqtt.example.com -t "topic/test" -m "test123" -i "thing001" -p 18831
Client thing001 sending CONNECT
Client thing001 received CONNACK
Client thing001 sending PUBLISH (d0, q0, r0, m1, 'topic/test', ... (7 bytes))
Client thing001 sending DISCONNECT
Enabling nginScript for NGINX and NGINX Plus
- Loading nginScript for NGINX Plus
- Loading nginScript for Open Source NGINX
- Compiling nginScript as a Dynamic Module for Open Source NGINX
Loading nginScript for NGINX Plus
nginScript is available as a free dynamic module for NGINX Plus subscribers (for open source NGINX, see Loading nginScript for Open Source NGINX below).
-
Obtain the module itself by installing it from the NGINX Plus repository.
-
For Ubuntu and Debian systems:
$ sudo apt‑get install nginx-plus-module-njs
For RedHat, CentOS, and Oracle Linux systems:
$ sudo yum install nginx-plus-module-njs -
-
Enable the module by including a
load_moduledirective for it in the top‑level ("main") context of the nginx.conf configuration file (not in thehttporstreamcontext). This example loads the nginScript modules for both HTTP and TCP/UDP traffic.load_module modules/ngx_http_js_module.so; load_module modules/ngx_stream_js_module.so; -
Reload NGINX Plus to load the nginScript modules into the running instance.
$ sudo nginx -s reload
Loading nginScript for Open Source NGINX
If your system is configured to use the official prebuilt packages for open source NGINX and your installed version is 1.9.11 or later, then you can install nginScript as a prebuilt package for your platform.
-
Install the prebuilt package.
-
For Ubuntu and Debian systems:
$ sudo apt-get install nginx-module-njs -
For RedHat, CentOS, and Oracle Linux systems:
$ sudo yum install nginx-module-njs
-
-
Enable the module by including a
load_moduledirective for it in the top‑level ("main") context of the nginx.conf configuration file (not in thehttporstreamcontext). This example loads the nginScript modules for both HTTP and TCP/UDP traffic.load_module modules/ngx_http_js_module.so; load_module modules/ngx_stream_js_module.so; -
Reload NGINX Plus to load the nginScript modules into the running instance.
$ sudo nginx -s reload
Compiling nginScript as a Dynamic Module for Open Source NGINX
If you prefer to compile an NGINX module from source:
- Follow these instructions to build either or both the HTTP and TCP/UDP nginScript modules from the open source repository.
- Copy the module binaries (ngx_http_js_module.so, ngx_stream_js_module.so) to the modules subdirectory of the NGINX root (usually /etc/nginx/modules).
- Perform Steps 2 and 3 in Loading nginScript for Open Source NGINX.