Note: This tutorial is part of Microservices March 2022: Kubernetes Networking.
- Reduce Kubernetes Latency with Autoscaling
- Protect Kubernetes APIs with Rate Limiting
- Protect Kubernetes Apps from SQL Injection (this post)
- Improve Uptime and Resilience with a Canary Deployment (coming soon)
You work in IT for a popular local store that sells a variety of goods, from pillows to bicycles. They’re about to launch their first online store, but before launch they’ve asked a security expert to pen test the site before it goes public. Unfortunately, the security expert found a problem! The online store is vulnerable to SQL injection. The security expert was able to exploit the site to obtain sensitive information from your database, including usernames and passwords.
Your team has come to you – the Kubernetes engineer – to save the day. Luckily, you know that SQL injection – as well as other vulnerabilities – can be mitigated using Kubernetes traffic management tools. You already deployed an Ingress controller to expose the app and, in a single configuration, you’re able to ensure this vulnerability can’t be exploited. Now, the online store can launch on time. Well done!
Lab and Tutorial Overview
This blog accompanies the lab for Unit 3 of Microservices March 2022 – Microservices Security Pattern – but you can also use it as a tutorial in your own environment (get the examples from our GitHub repo). It demonstrates how to use NGINX and NGINX Ingress Controller to block SQL injection.
The easiest way to do the lab is to register for Microservices March 2022 and use the browser-based lab that’s provided. If you want to do it as a tutorial in your own environment, you need a machine with:
- 2 CPUs or more
- 2 GB of free memory
- 20 GB of free disk space
- Internet connection
- Container or virtual machine manager, such as Docker, Hyperkit, Hyper-V, KVM, Parallels, Podman, VirtualBox, or VMware Fusion/Workstation
- minikube installed
- Helm installed
Note: This blog is written for minikube running on a desktop/laptop that can launch a browser window. If you’re in an environment where that’s not possible, then you’ll need to troubleshoot how to get to the services via a browser.
To get the most out of the lab and tutorial, we recommend that before beginning you:
- Watch the recording of the livestreamed conceptual overview
- Review the background blogs, webinar, and video
- Watch the 16-minute video summary of the lab:
This tutorial uses these technologies:
- NGINX Open Source
- NGINX Ingress Controller (based on NGINX Open Source)
- Helm
- minikube
- A simple app with security vulnerabilities
This tutorial includes four challenges:
- Deploy a Cluster and Vulnerable App
- Hack the App
- Use an NGINX Sidecar Container to Block Certain Requests
- Configure NGINX Ingress Controller to Filter Requests
Challenge 1: Deploy a Cluster and Vulnerable App
In this challenge, you will deploy a minikube cluster and install Podinfo as a sample app and API.
Create a Minikube Cluster
Deploy a minikube cluster. After a few seconds, a message confirms the deployment was successful.
$ minikube start

🏄  Done! kubectl is now configured to use "minikube" cluster and "default" namespace by default
Create a Vulnerable App
Step 1: Create a Deployment
You are going to deploy a simple online store app that includes two microservices:
- A MariaDB database
- A PHP app that connects to the database and retrieves data
- Using the text editor of your choice, create a YAML file called 1-app.yaml with the following contents:
- Deploy the app and API:
- Confirm that the Podinfo pods deployed, as indicated by the value
Runningin theSTATUScolumn. It can take 30-40 seconds for them to fully deploy, so it’s useful to run the command again to confirm all pods are running before continuing to the next step. - For the homepage, the page retrieves all items in the database.
- For the product page, the item is fetched by ID.
- Modify the URL:
- The first quote ” completes the first query.
- We add our own query after the quote.
- The — // sequence discards the rest of the query.
- Extract user data:
-1"forces to return an empty set from the first query.UNIONforces two database tables together – such as products and users – which allows the hacker to obtain information (passwords) that shouldn’t be associated with the original table (products).UNION SELECT * FROM usersselect all the rows from the users table.- The
-- //sequence discards everything after. - Proxy all the traffic to the app in the pod.
- Use an Ingress controller to filter all traffic entering the cluster.
- Create a YAML file called 2-app-sidecar.yaml with the contents below, and check out these noteworthy components:
- A sidecar container running NGINX is started on port 8080.
- The NGINX process forwards all traffic to the app.
- Any request that includes a
SELECTorUNIONkeyword is denied. - The service for the app routes all traffic to the NGINX container first.
- Deploy the sidecar:
- It is not a full security solution.
- It is not scalable (you can’t easily apply this protection to multiple apps).
- Updating it is complicated and inefficient.
- Add the NGINX repository to Helm:
- Download and install the NGINX Open Source-based NGINX Ingress Controller, which is maintained by F5 NGINX. Notice that this command includes
enableSnippets=true. Snippets will be used to configure NGINX to block the SQL injection. The final line of output confirms successful installation. - Confirm that the NGINX Ingress Controller pod deployed, as indicated by the value
Runningin theSTATUScolumn. - Create a YAML file called 3-ingress.yaml with the following contents. It defines the Ingress manifest required to route traffic to the app (the traffic won’t go through the sidecar proxy this time). Notice NGINX Ingress controller is customized with a snippet defined as an annotation, and the snippet contains the same lines injected into the sidecar container as the last challenge.
- Deploy the Ingress resource:
- Watch the high-level overview webinar
- Review the collection of technical blogs and videos
apiVersion: apps/v1
kind: Deployment
metadata:
  name: app
spec:
  selector:
    matchLabels:
      app: app
  template:
    metadata:
      labels:
        app: app
    spec:
      containers:
        - name: app
          image: f5devcentral/microservicesmarch:1.0.3
          ports:
            - containerPort: 80
          env:
            - name: MYSQL_USER
              value: dan
            - name: MYSQL_PASSWORD
              value: dan
            - name: MYSQL_DATABASE
              value: sqlitraining
            - name: DATABASE_HOSTNAME
              value: db.default.svc.cluster.local
---
apiVersion: v1
kind: Service
metadata:
  name: app
spec:
  ports:
    - port: 80
      targetPort: 80
      nodePort: 30001
  selector:
    app: app
  type: NodePort
---
apiVersion: apps/v1
kind: Deployment
metadata:
  name: db
spec:
  selector:
    matchLabels:
      app: db
  template:
    metadata:
      labels:
        app: db
    spec:
      containers:
        - name: db
          image: mariadb:10.3.32-focal
          ports:
            - containerPort: 3306
          env:
            - name: MYSQL_ROOT_PASSWORD
              value: root
            - name: MYSQL_USER
              value: dan
            - name: MYSQL_PASSWORD
              value: dan
            - name: MYSQL_DATABASE
              value: sqlitraining

---
apiVersion: v1
kind: Service
metadata:
  name: db
spec:
  ports:
    - port: 3306
      targetPort: 3306
  selector:
    app: db
$ kubectl apply -f 1-app.yaml
deployment.apps/app created
service/app created
deployment.apps/db created
service/db created
$ kubectl get pods
NAME                  READY   STATUS    RESTARTS   AGE
app-d65d9b879-b65f2   1/1     Running   0          37s
db-7bbcdc75c-q2kt5    1/1     Running   0          37s
Open the app in your browser:
$ minikube service app
|-----------|------|-------------|--------------|
| NAMESPACE | NAME | TARGET PORT |     URL      |
|-----------|------|-------------|--------------|
| default   | app  |             | No node port |
|-----------|------|-------------|--------------|
😿  service default/app has no node port
🏃  Starting tunnel for service app.
|-----------|------|-------------|------------------------|
| NAMESPACE | NAME | TARGET PORT |          URL           |
|-----------|------|-------------|------------------------|
| default   | app  |             | http://127.0.0.1:55446 |
|-----------|------|-------------|------------------------|
🎉  Opening service default/app in default browser...
Challenge 2: Hack the App
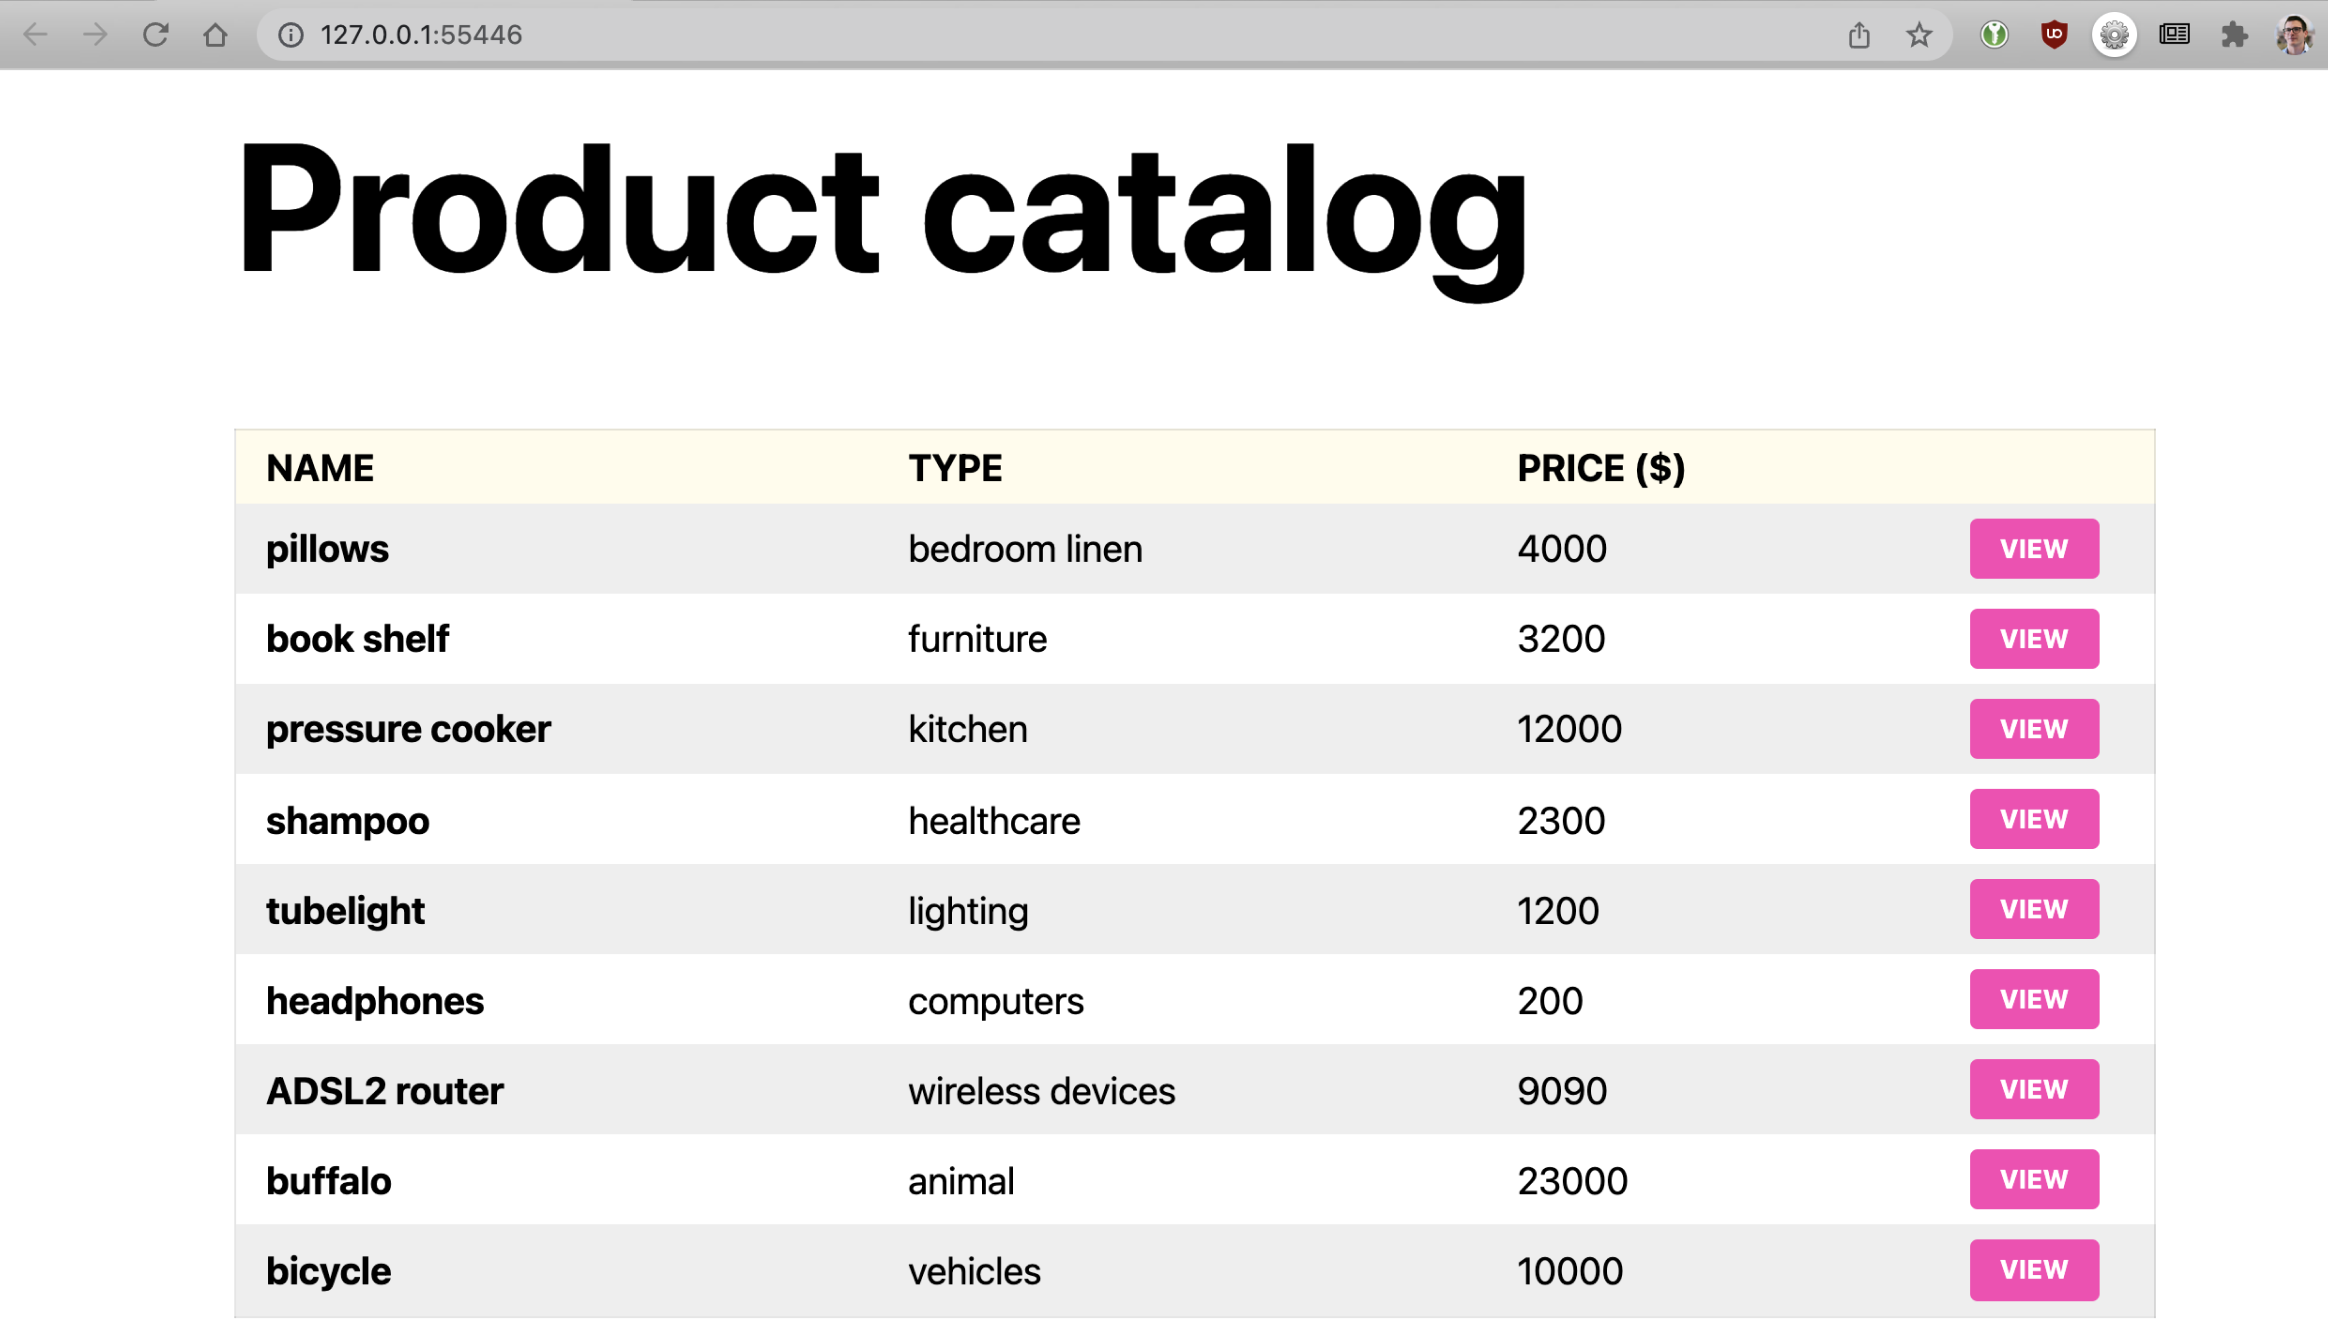
The sample application is rather basic. It includes a homepage with a list of items (e.g. pillows) and a set of product pages with details (e.g. description and price). Data is stored in the MariaDB database. Each time a page is requested, an SQL query is issued to the database.
If you open the “pillows” product page, you may notice the URL ends in /product/1. The “1” at the end of the URL is the ID used to identify the product. To prevent direct insertion of malicious code to the SQL query, the best practice is to sanitize user input before processing requests. But what if the app isn’t properly configured, and the input is not escaped before inserting it into the SQL query and database?
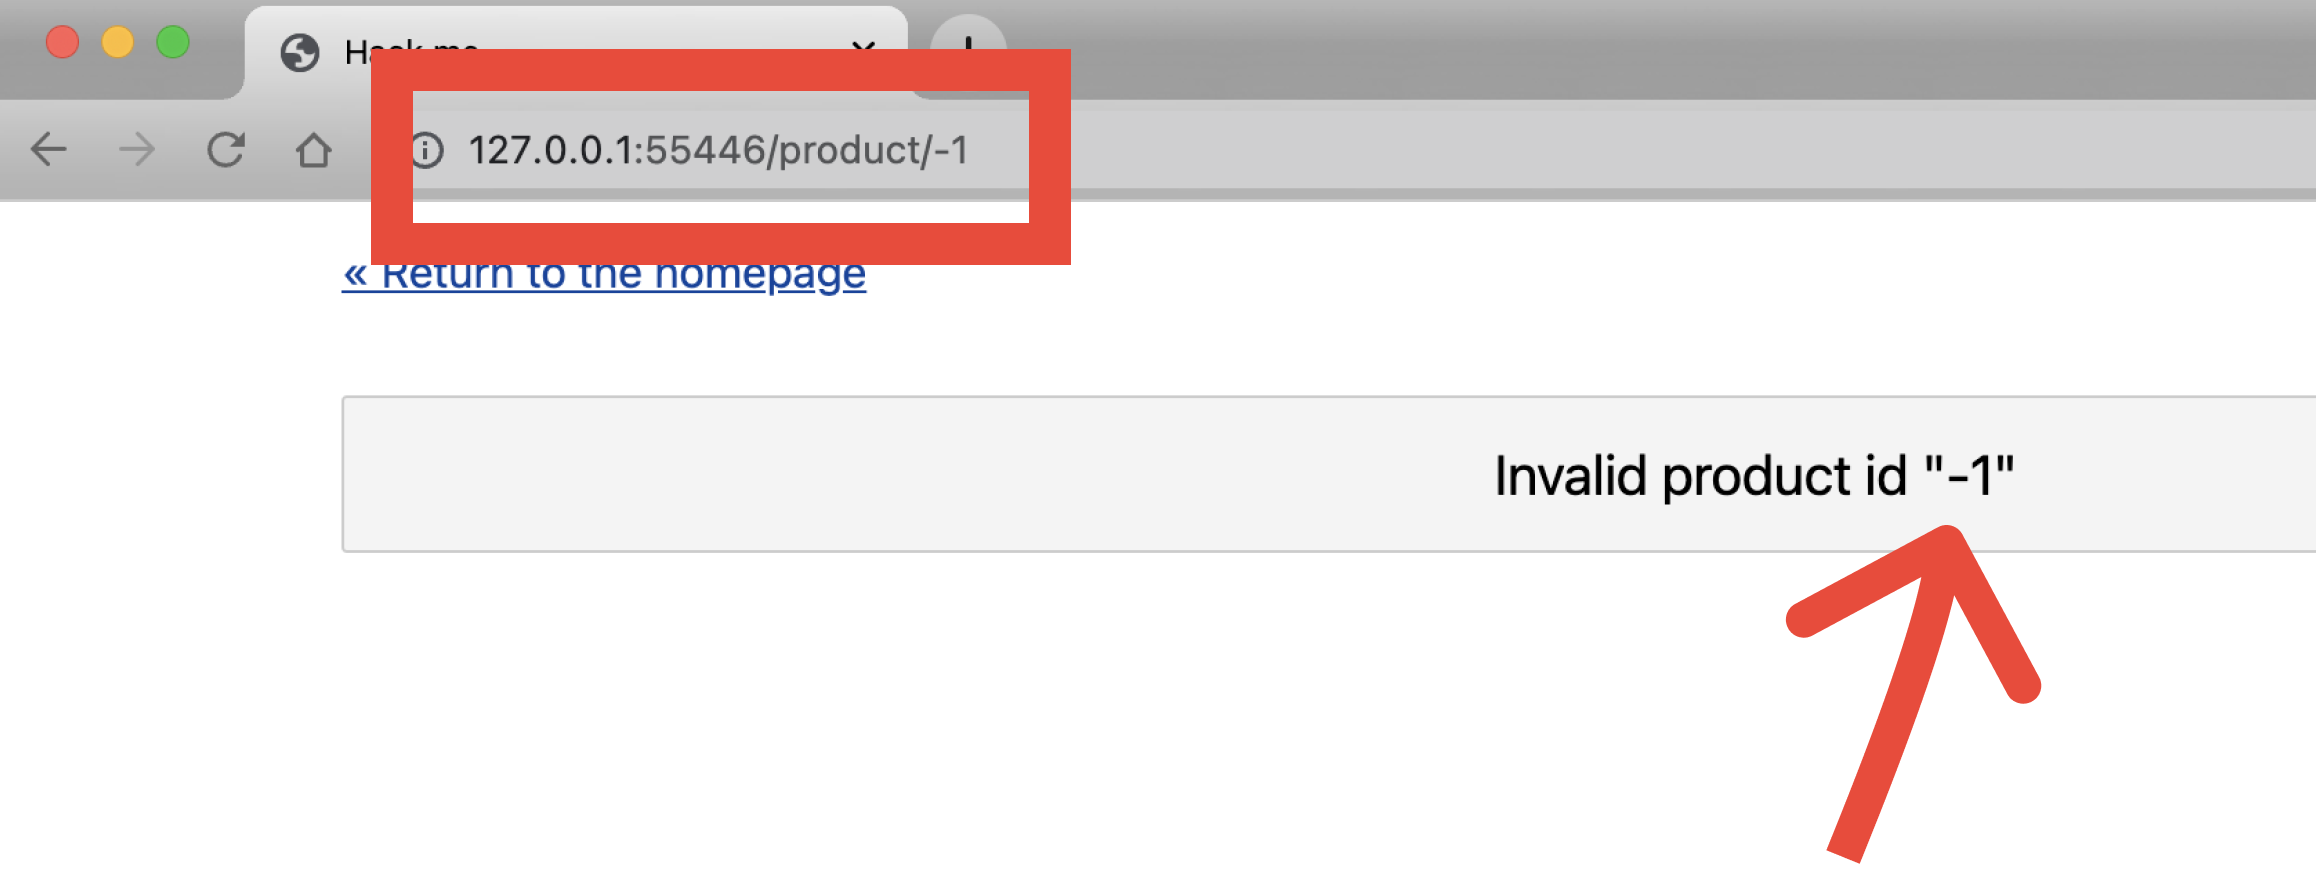
We will find out if the input is properly escaped with a simple experiment: changing the ID to one that doesn’t exist in the database.
Manually change the URL ending from 1 to -1. This returns the error message Invalid product id “-1” indicating that the ID of the product is not escaped because the string is inserted directly into the query. That’s not good! (Unless you’re a hacker.)
We can assume the database query is something like SELECT * FROM some_table WHERE id = "1". To exploit it, we could replace the 1 with -1″
If you were to change the URL ending to -1" or 1 -- //, the query should compile to:
SELECT * FROM some_table WHERE id = "-1" OR 1 -- //"
                                      --------------
                                      ^  injected  ^
It should select all rows from the database, which is useful in a hack. To find out if this is the case, change the URL ending to –1". The resulting error message gives you more useful information about the database:
Fatal error: Uncaught mysqli_sql_exception: You have an error in your SQL syntax; check the manual that corresponds to your MariaDB server version for the right syntax to use near '"-1""' at line 1 in /var/www/html/product.php:23 Stack trace: #0 /var/www/html/product.php(23): mysqli->query('SELECT * FROM p...') #1 {main} thrown in /var/www/html/product.php on line 23
Now, we can start manipulating the results with an attempt to order the database results by ID using -1″ OR 1 ORDER BY id DESC — //. This results in a product page containing the last item in the database.
Forcing the database to order results is interesting, but not especially useful if we’re up to no good. Perhaps we could extract more information from the database, such as user data.
We can safely assume there’s a users table in the database that contains usernames and passwords. But how can we get from products table to users table?
That can be accomplished with -1″ UNION SELECT * FROM users — //.
When we modify the URL to end in -1" UNION SELECT * FROM users -- //, we get a new error message:
Fatal error: Uncaught mysqli_sql_exception: The used SELECT statements have a different number of columns in /var/www/html/product.php:23 Stack trace: #0 /var/www/html/product.php(23): mysqli->query('SELECT * FROM p...') #1 {main} thrown in /var/www/html/product.php on line 23
This message informs us that the products table and users table don’t have the same number of columns, so it can’t execute the UNION statement. The number of columns can be discovered through trial and error by adding columns to SELECT. There is probably a password field on the users table, so we can try the following permutations (note that each version adds a column):
-1" UNION SELECT password FROM users; -- // <-- 1 column
-1" UNION SELECT password,password FROM users; -- // <-- 2 columns
-1" UNION SELECT password,password,password FROM users; -- // <-- 3 columns
-1" UNION SELECT password,password,password,password FROM users; -- // <-- 4 columns
-1" UNION SELECT password,password,password,password,password FROM users; -- // <-- 5 columns
Success! It works when we use the statement with five columns. This response shows the password of a user.
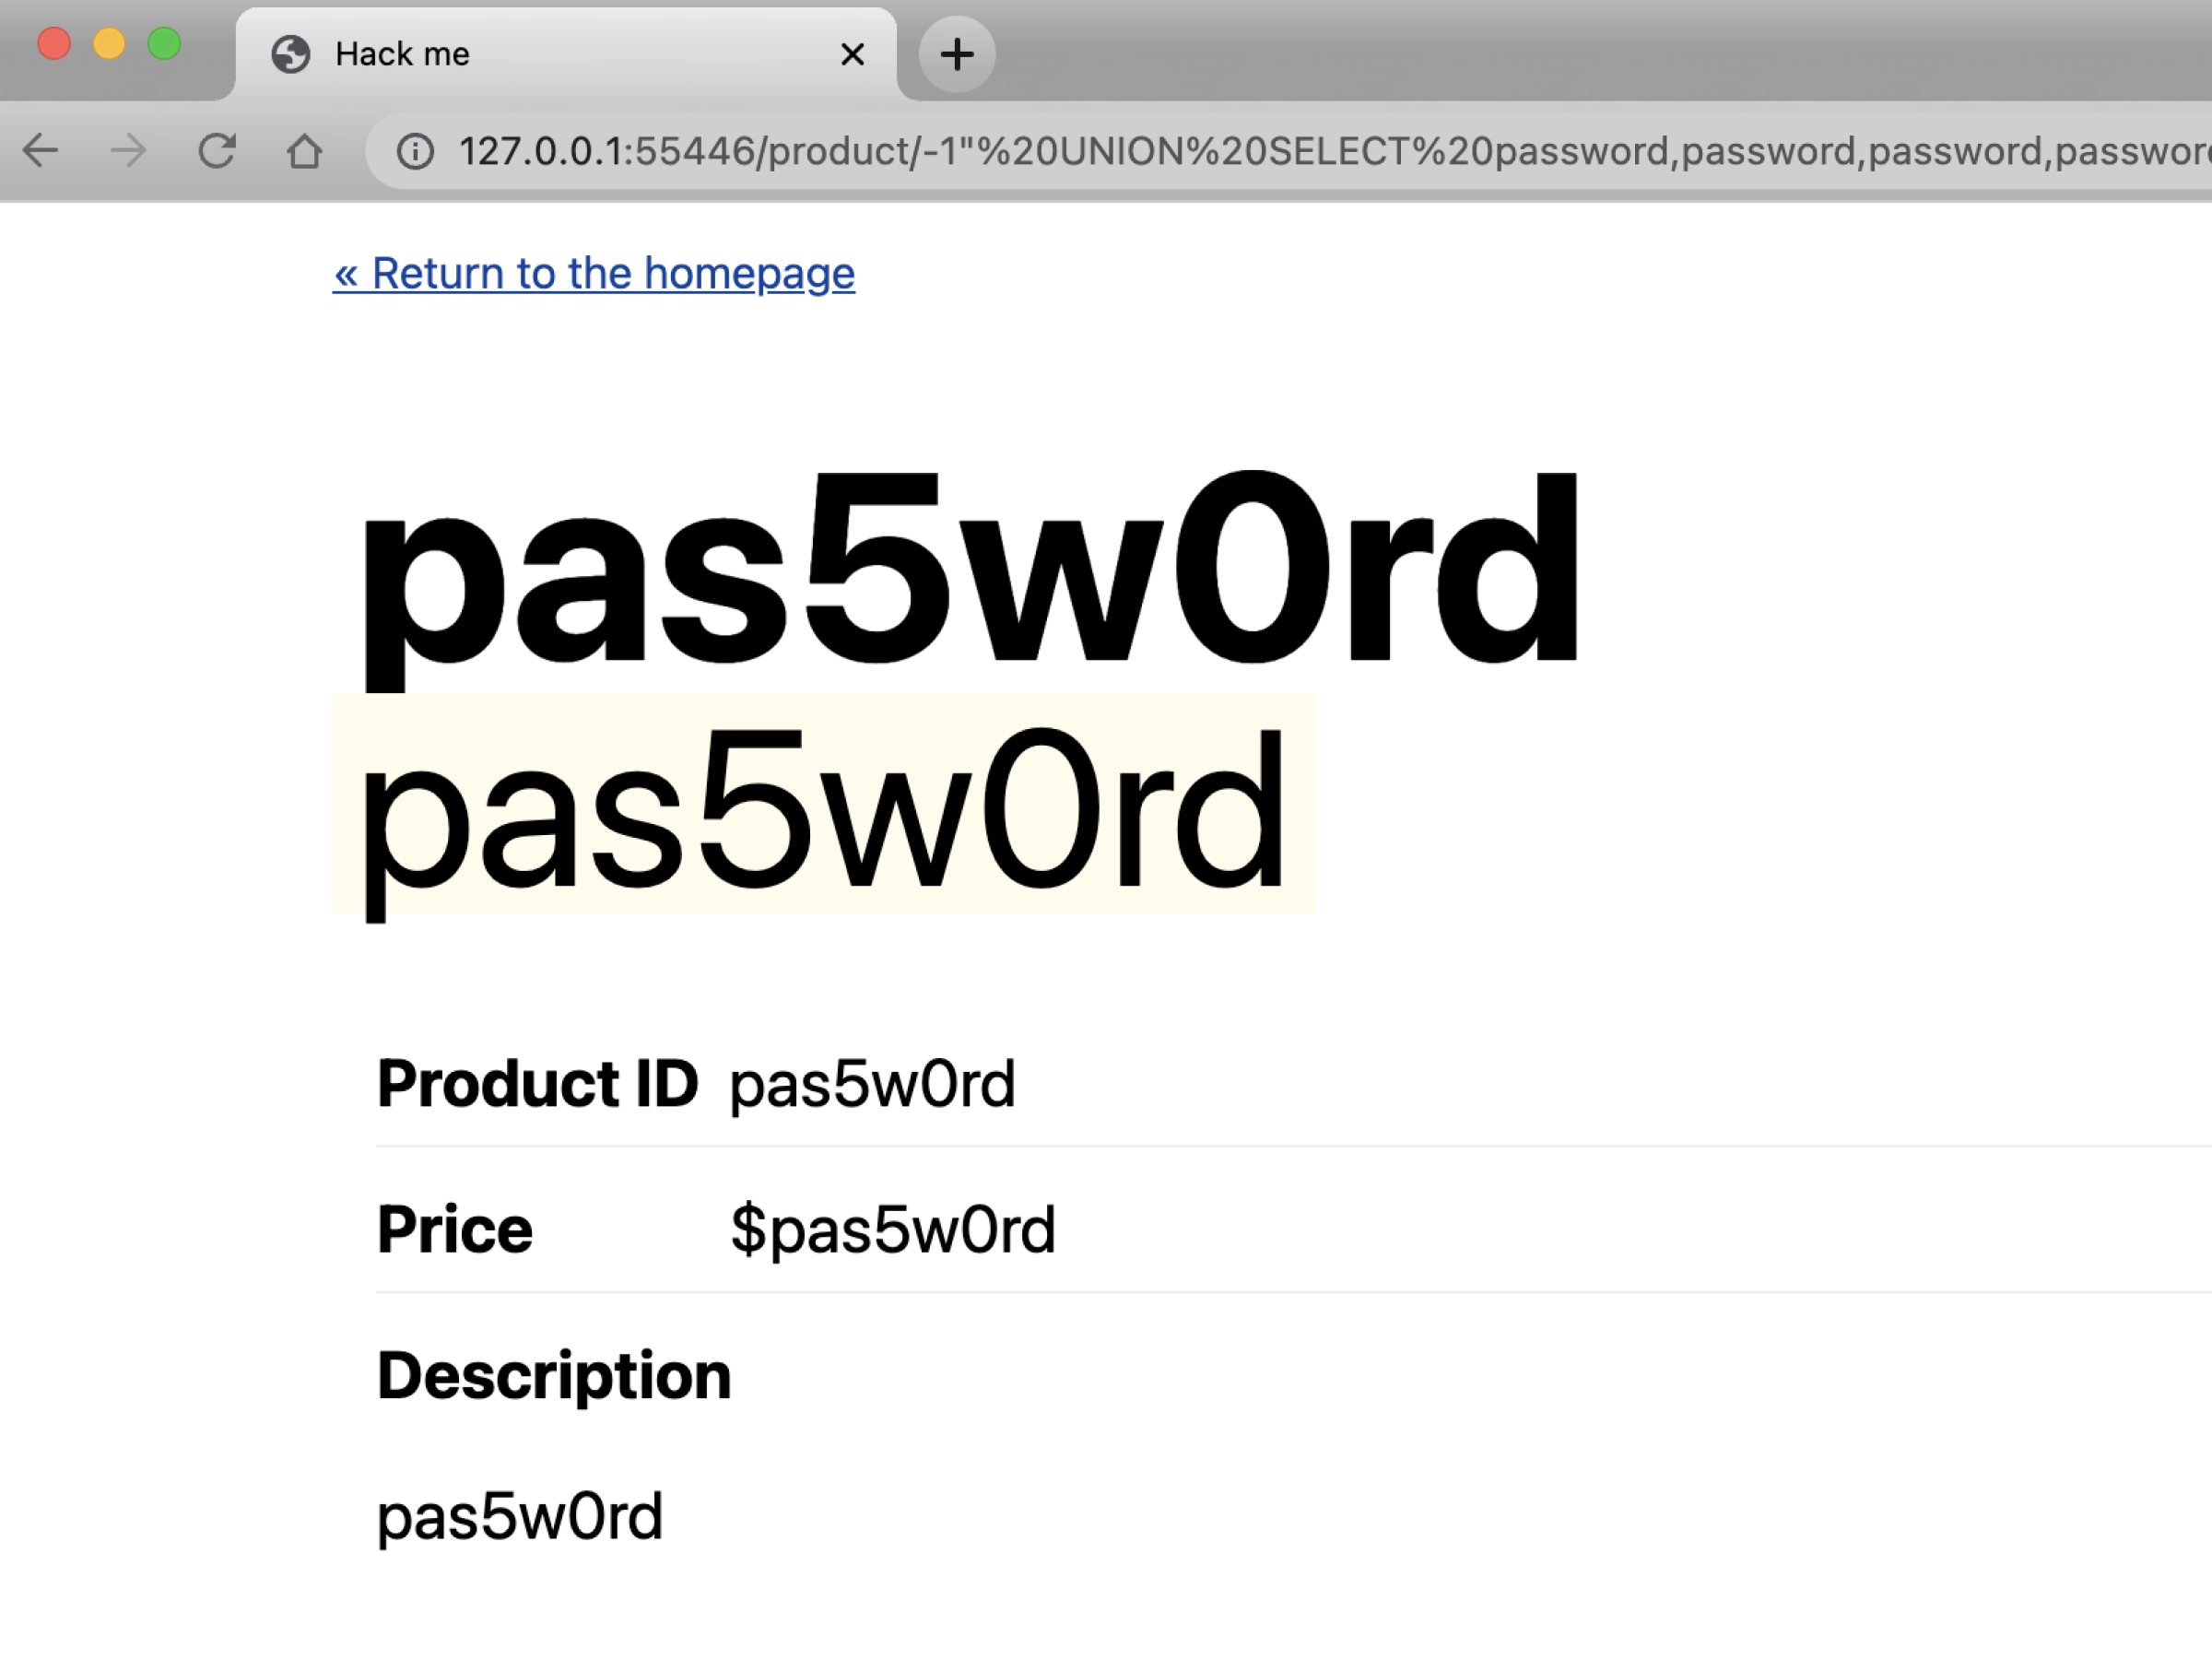
Now that we know there are a total of five columns in the users table, we could continue trying to find the other column names using the same tactic. Wouldn’t it be useful to get the username that corresponds to the password you exposed? The following query exposes both the username and password from the users table. Which is great – unless this app is hosted on your infrastructure!
-1" UNION SELECT username,username,password,password,username FROM users where id=1 -- //

Challenge 3: Use an NGINX Sidecar Container to Block Certain Requests
Of course, whoever wrote the app should pay more attention to escape user input (such as use of parameterized queries), but you – the Kubernetes engineer – can also help avoid SQL injection by preventing this attack from reaching the app. That way, even if the app is vulnerable, attacks can still be stopped.
There are multiple options for protecting your apps. For the rest of this lab, we’re going to focus on two:
This challenge explores how to implement the first option by injecting a sidecar container to filter traffic. We use NGINX Open Source as a sidecar container in the pod to proxy all of the traffic and deny any request that has a UNION statement in the URL.
Note: This tutorial leverages this technique for illustration purposes only. In reality, manually deploying proxies as sidecars isn’t the best solution (more on that later).
Deploy NGINX Open Source as a Sidecar
apiVersion: apps/v1
kind: Deployment
metadata:
  name: app
spec:
  selector:
    matchLabels:
      app: app
  template:
    metadata:
      labels:
        app: app
    spec:
      containers:
        - name: app
          image: f5devcentral/microservicesmarch:1.0.3
          ports:
            - containerPort: 80
          env:
            - name: MYSQL_USER
              value: dan
            - name: MYSQL_PASSWORD
              value: dan
            - name: MYSQL_DATABASE
              value: sqlitraining
            - name: DATABASE_HOSTNAME
              value: db.default.svc.cluster.local
        - name: proxy # <-- sidecar
          image: "nginx"
          ports:
            - containerPort: 8080
          volumeMounts:
            - mountPath: /etc/nginx
              name: nginx-config
      volumes:
        - name: nginx-config
          configMap:
            name: sidecar
---
apiVersion: v1
kind: Service
metadata:
  name: app
spec:
  ports:
    - port: 80
      targetPort: 8080 # <-- the traffic is routed to the proxy
      nodePort: 30001
  selector:
    app: app
  type: NodePort
---
apiVersion: v1
kind: ConfigMap
metadata:
  name: sidecar
data:
  nginx.conf: |-
    events {}
    http {
      server {
        listen 8080 default_server;
        listen [::]:8080 default_server;

        location ~* "(\'|\")(.*)(drop|insert|md5|select|union)" {
            deny all;
        }

        location / {
            proxy_pass http://localhost:80/;
        }
      }
    }
---
apiVersion: apps/v1
kind: Deployment
metadata:
  name: db
spec:
  selector:
    matchLabels:
      app: db
  template:
    metadata:
      labels:
        app: db
    spec:
      containers:
        - name: db
          image: mariadb:10.3.32-focal
          ports:
            - containerPort: 3306
          env:
            - name: MYSQL_ROOT_PASSWORD
              value: root
            - name: MYSQL_USER
              value: dan
            - name: MYSQL_PASSWORD
              value: dan
            - name: MYSQL_DATABASE
              value: sqlitraining

---
apiVersion: v1
kind: Service
metadata:
  name: db
spec:
  ports:
    - port: 3306
      targetPort: 3306
  selector:
    app: db
$ kubectl apply -f 2-app-sidecar.yaml
deployment.apps/app configured
service/app configured
configmap/sidecar created
deployment.apps/db unchanged
service/db unchanged
Test the Filter
Test whether the sidecar is filtering traffic by returning to the app and trying the SQL injection again. NGINX blocks the request before it reaches the app!
-1" UNION SELECT username,username,password,password,username FROM users where id=1 -- //

Challenge 4: Configure NGINX Ingress Controller to Filter Requests
Protecting your app in the manner demonstrated in the last challenge is an interesting and educational experience, but it’s not recommended for production because:
Use of an Ingress controller to extend the same feature to all of your apps is a much better solution! Ingress controllers can be used to centralize all kinds of security features, from a web application firewall (WAF) to authentication and authorization.
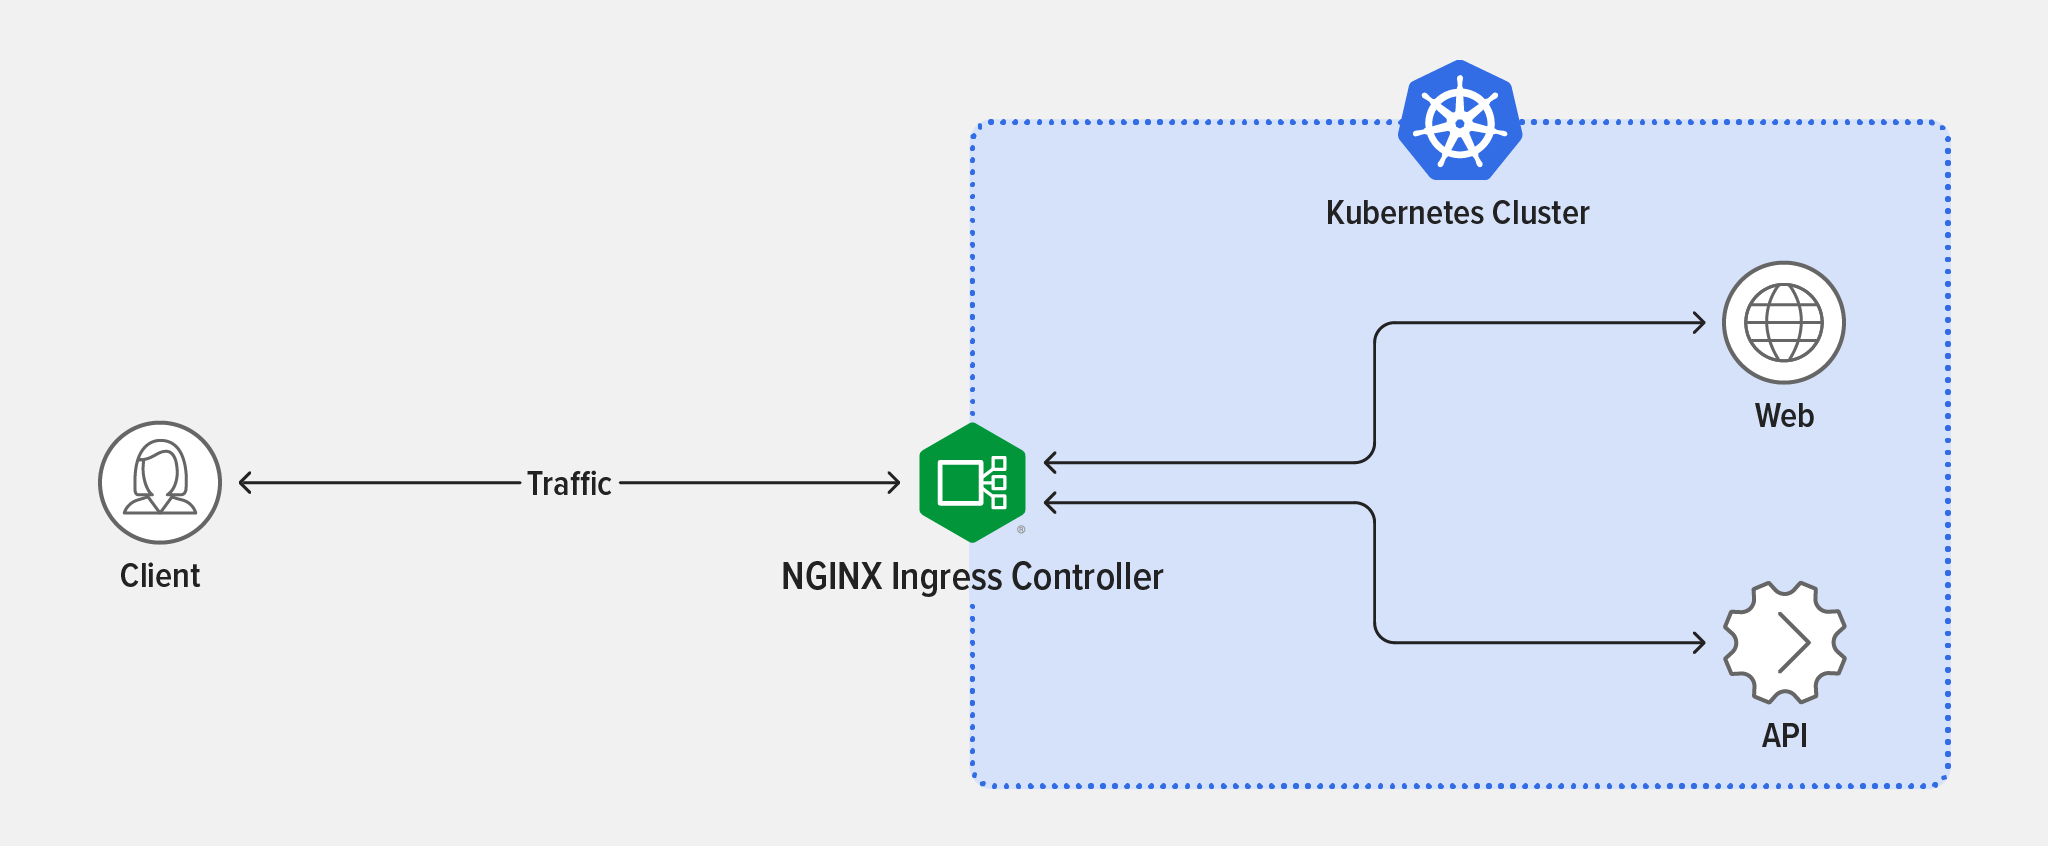
Deploy NGINX Ingress Controller
The fastest way to install NGINX Ingress Controller is with Helm.
$ helm repo add nginx-stable https://helm.nginx.com/stable
$ helm install main nginx-stable/nginx-ingress \
--set controller.watchIngressWithoutClass=true
--set controller.service.type=NodePort \
--set controller.service.httpPort.nodePort=30005 \
--set controller.enableSnippets=true
NAME: main
LAST DEPLOYED: Tue Feb 22 19:49:17 2022
NAMESPACE: default
STATUS: deployed
REVISION: 1
TEST SUITE: None
NOTES: The NGINX Ingress Controller has been installed.
$ kubectl get pods
NAME                                  READY   STATUS    RESTARTS   AGE
main-nginx-ingress-779b74bb8b-mtdkr   1/1     Running   0          18s
Route Traffic to Your App
apiVersion: v1
kind: Service
metadata:
  name: app-without-sidecar
spec:
  ports:
    - port: 80
      targetPort: 80
  selector:
    app: app
---
apiVersion: networking.k8s.io/v1
kind: Ingress
metadata:
  name: entry
  annotations:
    nginx.org/server-snippets: |
      location ~* "(\'|\")(.*)(drop|insert|md5|select|union)" {
          deny all;
      }
spec:
  ingressClassName: nginx
  rules:
    - host: "example.com"
      http:
        paths:
          - backend:
              service:
                name: app-without-sidecar
                port:
                  number: 80
            path: /
            pathType: Prefix
$ kubectl apply -f 3-ingress.yaml
service/app-without-sidecar created
ingress.networking.k8s.io/entry created
Test the Filter
You need a new URL that routes traffic to the port, where the Ingress Controller is listening. To obtain the URL, launch a temporary busybox container that issues a request to the NGINX Ingress pod with the correct hostname.
$ kubectl run -ti --rm=true busybox --image=busybox
$ wget --header="Host: example.com" -qO- main-nginx-ingress
<!DOCTYPE html>
<html lang="en">

<head>
# truncated output
Now, try to issue the SQL injection. Again, NGINX blocks the attack!
$ wget --header="Host: example.com" -qO- 'main-nginx-ingress/product/-1"%20UNION%20SELECT%20username,username,password,password,username%20FROM%20users%20where%2
0id=1%20--%20//'
wget: server returned error: HTTP/1.1 403 Forbidden
Next Steps
Kubernetes is not secure by default. Use of an Ingress controller can mitigate SQL (and many other) vulnerabilities. But keep this in mind: Even though you just implemented WAF –like functionality, an Ingress controller does not replace a web application firewall (WAF), nor is it a replacement for securely architecting apps. A savvy hacker can still make the UNION hack work with some small changes to the code. For more on this topic, read A Pentester’s Guide to SQL Injection (SQLi). That said, an Ingress controller is still a powerful tool for centralizing most of your security, leading to greater efficiency and security including centralized authentication and authorization use cases (mTLS, single sign –on) and even a robust WAF like NGINX App Protect WAF.
The complexity of your apps and architecture might require more fine –grain control. If your organization requires Zero Trust and has a need for end –to –end encryption, consider a service mesh. When you have communication between services (east –west traffic), a service mesh allows you to control traffic at that level. We explore service meshes in Unit 4: Advanced Kubernetes Deployment Strategies.
You can use this blog to implement the tutorial in your own environment or try it out in our browser –based lab (register here). To learn more on the topic of exposing Kubernetes services, follow along with the other activities in Unit 3: Microservices Security Pattern:
Visit NGINX.org for details on how to obtain and implement NGINX Open Source.
To try NGINX Ingress Controller for Kubernetes with NGINX Plus and NGINX App Protect, start your free 30-day trial today or contact us to discuss your use cases.
To try NGINX Ingress Controller with NGINX Open Source, you can obtain the release source code, or download a prebuilt container from DockerHub.