Introduction – How NGINX is Used with PHP
PHP is the most popular way to create a server‑side Web application, with roughly 80% market share. (ASP.net is a distant second, and Java an even more distant third.)
The PHP universe includes a multitude of PHP frameworks; the most popular include Laravel, Phalcon, and Symfony 2. PHP is also the basis for popular content management systems (CMSs) such as WordPress and Drupal. (The most recent Drupal release, Drupal 8, includes significant Symfony 2 integration.
Now the PHP team is releasing a new version, PHP 7 – more than a decade after the introduction of PHP 5. During this time, usage of the web and the demands on websites have both increased exponentially. PHP has contributed to that rapid growth – but PHP’s limitations are also highlighted by the very growth that it has enabled.
PHP is commonly seen as powerful and flexible, but subject to performance problems. PHP‑based sites can easily “hit a wall” after just a few doublings in traffic numbers. Just as a site begins to meet its business or operational goals, it starts to crash whenever traffic volume rises.
For thousands and thousands of PHP‑based applications, some relatively simple changes have been enough to improve performance. These include caching with tools such as memcached, tuning databases, and reverse proxy and load balancing with open source NGINX software and NGINX Plus. NGINX has greatly improved app responsiveness, supporting order‑of‑magnitude increases in user and traffic numbers.
This blog post is the first in a two‑part series about maximizing the performance of your websites that use PHP 7. Here we focus on upgrading to PHP 7, implementing open source NGINX or NGINX Plus as your web server software, rewriting URLs (necessary for requests to be handled properly), caching static files, and caching dynamic files (also called application caching or microcaching).
In the next blog post, we focus on steps you can take with additional servers: adding a reverse proxy server, moving to multiple application servers, load balancing among multiple servers, supporting session persistence while load balancing, and terminating security protocols, such as SSL/TLS and the related HTTP/2 protocol.
Why PHP Hits a Wall
Why do PHP applications hit a wall? For the same reason any application server software hits a wall. When a user request comes in, PHP – and the web server software it runs on top of – have to do several things:
- Decipher the request. First the web server software and then PHP have to spin up processes to receive, decipher, and act on the request. Apache HTTP Server, for example, assigns resources to handle each data request, however simple (retrieving a JPEG file) or complex (processing nested CSS requests). This all takes time, system resources, and a memory allocation – which can be quite large if the OS, PHP, or both have to load a number of libraries before even starting to process the request.
- Handle supporting protocols. If you run SSL/TLS and/or HTTP/2, your web server software has to decode requests, a potentially time‑consuming process.
- Act on the request. PHP has to pull together the resources to handle the request. This can require multiple database calls, calls out across the Internet to external services, and complicated internal processing.
- Reply to the request. PHP has to return the results to the web server software for transmission back to the requester as an HTTP response. Remember, both the web server software and PHP are running an active, dedicated thread for each request, from initial receipt to final acknowledgement.
That’s a lot for a physical server, virtual machine, or cloud server instance to handle for every request. Performance tends to bog down when physical memory on the server machine – whether physical or virtual – is exhausted. The server then starts paging current sessions to disk as new requests come in. Waiting for file requests to fulfill also introduces wait states that contribute to paging as well. Past a (very limited) point, paging operations and data requests overwhelm processing operations, and performance enters a death spiral that causes long waits or outright session termination for frustrated users.
Addressing Performance Issues
Overcoming PHP’s performance barriers is certainly possible, and it takes several complementary steps. Each step can be combined with others. Roughly, they include:
- Throwing hardware at the problem. More memory, more memory, faster disks, separate database servers, a content delivery network, increased throughput capacity, and other mechanical solutions are a quick and dirty solution to performance problems. These solutions may preserve uptime or scale performance linearly.
- Improving PHP and application code. New versions of PHP, new frameworks, and improved application code can help a lot. Again, doubling or even quadrupling performance is possible, with no additional expenditures for new hardware.
- Improved server software. Most web servers and PHP assign dedicated resources to each open request in progress. NGINX server software handles requests as they come in, without tying up resources, minimizing server footprint.
- Multiserver implementation. You can implement a reverse proxy server to handle Internet requests and share them (load balance) among one or more application servers. The reverse proxy server can also handle file caching, termination of protocols such as SSL/TLS and HTTP/2, and management of multiple application servers. Even with just one application server, this offloads a huge part of its workload. Load balancing guarantees that no server gets bogged down with more than its share of the load as more servers are added.
You don’t have to implement these steps in any particular order; for instance, even if you keep Apache as your web server and don’t upgrade your app server to PHP 7, just implementing NGINX as a reverse proxy “in front of” your existing servers improves performance and enables you to implement multiple application servers in parallel.
However you go about things, the key fact to keep in mind is that you can obtain multiple factors of increased performance, even an order of magnitude in capacity, with little or no change to your current application code. Read on to see how people have already achieved, or are in the process of achieving, these extraordinary performance gains.
Note: There’s a multiserver optimization that we’ll ignore somewhat in these blog posts. A separate database server and a content delivery network (CDN) can offload your application server and improve performance greatly; these kinds of changes are separate from, and parallel to, the application and implementation improvements described here.
Tip 1 – Upgrade to PHP 7
The main reason for upgrading to PHP 7, sooner rather than later, is simple: application speed (significantly enabled by memory savings). PHP 7 is said to be twice as fast as previous versions of PHP, and to use considerably less memory. (Your mileage will doubtless vary, in both respects.)
Response time is, quite simply, critical for web applications. A faster web app – which also uses less memory, reducing the likelihood of page swapping and resulting performance problems – accomplishes three things:
- Makes users happier and more likely to visit and complete tasks on your site, such as reading articles, getting product information, hailing a jitney, renting a spare room, or buying things. That is, the reasons you created the site or app in the first place.
- Enables a given server to support more users without running the risk that it slows down or even keels over from additional users. Postponing doom is always a good thing.
- Makes your server less vulnerable to hacker attacks that overload your server to drive it out of production. Everyone gets attacked today, but the weak get attacked more, and more aggressively. So less vulnerability can be exponentially better than more.
These are all excellent reasons to upgrade; taken together, the case for upgrading seems almost overwhelming. And “upgrade to the latest version” is always the first recommendation for fixing many problems, even when there isn’t such a clear performance benefit. So why doesn’t everyone upgrade right away?
Simple: people hate to mess with old code, and for good reason. If an old app is working well enough, and developers get better results from creating new apps than from upgrading old ones, the old app can hang around, unchanged, for a very long time. (See the second blog post in this series for information on how to use NGINX to improve your app’s performance without any changes to your current web server and app.)
But the more efficient thing to do, if at all possible, is to begin your quest for greater performance by upgrading to PHP 7. Don’t start, though, until you have enough time to finish, especially without skimping on testing.
Let’s take a look at what it takes to upgrade to PHP 7:
- Changes to expression evaluation. You might need to change the way some expressions are written to make them evaluate correctly in PHP 7. (Or, if you’re being really careful and not upgrading all your PHP servers at once, to make them evaluate properly in both PHP 5.6 and PHP 7.) If you have variable variables, or variable properties, you will need to revise the code to make them evaluate the same way in both PHP versions.
- Syntax changes. PHP 7 does not support ASP or script tags. You can’t have multiple default cases for a switch. (We leave aside the controversy about
switchversusif-then-else.) - Removal of deprecated functionality. All sorts of things that were deprecated in various 5.x versions of PHP are now deader than a dead parrot. They simply do not work in PHP 7. If they are in your code, and you try to remove all of them, and you fail, your shopping cart code functionality is sure to disappear at 11:59 PM the night before Cyber Monday.
- New features. PHP 7 adds a number of new features to tempt anyone upgrading old code, but be careful about adding new features in a code cleanup. New features are often wonderful, or they wouldn’t have been added, but they’re also magnets for bugs (yours and others’) and future revision as PHP is upgraded further.
- General code review. Any time you touch code – heck, anytime you open a code file and are not sure whether you changed it or not – you really need to review everything in it, especially whatever you changed.
- Testing. Everything needs to be tested all the time. If you make any changes, you need to re‑test everything, and that still doesn’t mean you’ll catch every bug. A well‑implemented DevOps environment may make this testing relatively easy, but only a few of us live in that promised land as of today.
This blog at Engine Yard has good examples of most of these issues.
If you decide to go ahead and upgrade to PHP 7, consider doing a full performance review and revision of your code, or at least of its critical features, taking advantage of the new features in PHP 7. There’s no better way for you and your team, to skill up, and the changes you make, review, and test today are likely to serve you for many years to come. You’ll also get the most out of the other performance suggestions in this blog post, because optimized code benefits strongly from running in an optimized environment.
So, despite the fact that sites often deploy NGINX to get better performance without touching application code, we recommend that you take the bit in your teeth and charge forward. There’s a lot of help out there for making the move, or you can just roll up your sleeves and do it yourself. There’s a PHP 7 migration guide at the official PHP site, and a PHP 7 upgrade how‑to book from O’Reilly.
Tip 2 – Choose Open Source NGINX or NGINX Plus
NGINX is the software that runs more than 140 million websites, including half of the 10,000 busiest websites. (These measurements detect the web server at single‑server sites and the reverse proxy server at multiserver sites.) As a web server, both offer an immediate performance boost – in some cases, where a server running other software has been overloaded and thrashing, up to 10 times. As a reverse proxy server, both enable the use of multiple dedicated servers to scale out a deployment as extensively as needed.
Both PHP and Apache assign resources to every open request; if either or both have to load a number of libraries, the start‑up time per request and the memory footprint can be considerable. Moving to NGINX as your web server software removes this problem at the server level. Using the functionality of NGINX to offload work to the web server (such as serving static files), or to a reverse proxy server (all kinds of caching, protocol termination, load balancing, etc.) minimizes what PHP has to do, simplifying and speeding application processing.
If you have custom or proprietary Apache modules for your site, you might not be able to replace Apache with NGINX until you replace the modules. Check with NGINX to see if there are easy workarounds; if not, size the time and effort required to make the change.
Once you decide to go with NGINX, you have a choice between open source NGINX and NGINX Plus. Some of the most the most prominent features of NGINX Plus over open source NGINX are:
- Precompiled code. NGINX Plus is distributed in compiled form, including popular libraries and dynamic modules that you can add and remove on the fly. (Open source NGINX is available as both compiled and uncompiled code.) You can make a wide range of configuration changes without restarting the server.
- Support. NGINX Plus includes a support package, giving you direct access to NGINX engineers.
- Monitoring and management. DevOps‑friendly tools help you keep your server up and running to meet service level agreements (SLAs).
As a reverse proxy server, NGINX Plus has additional advantages:
- Load balancing. Both versions of NGINX support basic HTTP load balancing, but NGINX Plus adds more sophisticated algorithms and TCP load balancing.
- Session persistence. Along with load balancing, NGINX Plus offers more sophisticated session persistence, often highly relevant for PHP application servers.
- Monitoring and management. The full range of capabilities of NGINX Plus monitoring and management come into play in a multiserver deployment; the value of precompiled code and support are also maximized in more complex implementations.
Both open source NGINX and NGINX Plus support content caching and microcaching (also called application caching). Caching is helpful in the web server context, as it offloads the application server, but both functions are still sharing a single machine or virtual machine instance. On a reverse proxy server, caching can offload a significant amount of work from the application server device, offering greater performance advantages.
You can download open source NGINX software directly from nginx.org, where you’ll also find community support. To start a single NGINX Plus subscription, register for a free 30‑day trial or purchase online. For multiinstance bundles, contact NGINX Sales.
Tip 3 – Convert Apache Configuration to NGINX Syntax
When you move from Apache to NGINX as your web server software, there are a few changes you need to make – detailed in an excellent article on sitepoint.com:
- Create or convert configuration files. Change configuration code to specify which files NGINX (no longer Apache) should use for configuration.
- Change read/write permissions. Add permission to your account to carry out CRUD operations (Create, Read, Update, Delete) on files in the website’s root directory.
- Specify valid search patterns. Add a location block to specify which patterns NGINX can and cannot try while processing requests.
- Replace .htaccess configuration code. Configuration details for Apache tend to live in .htaccess files or in static configuration files (
mod_rewritedirectives, for example). Replace these with relevant configuration specifications in NGINX configuration files. For some examples, see our blog.
There is a also a good description of configuring NGINX and PHP to work together on the Dynatrace blog.
Making these changes familiarizes you with NGINX and equips you for optimizing more complex sites, as we describe in Part 2 of this blog post. If making these configuration changes poses an unacceptable amount of work or degree of risk to your site operations, however, never fear – you can implement the multiserver architectures described in Part 2 without upgrading the core web server software from Apache, and therefore without changing your web server configuration files.
Tip 4 – Implement Static File Caching
Static files are simply files that don’t change often, at least in web‑server terms. Static files usually include graphics files such as JPEGs and PNGs and code files such as CSS and JavaScript files. If you put these files on your application server, or on a separate database server, requests for them have to be processed by the application code, with all the overhead required for making and fulfilling a request. This “distracts” the application server from more important work and can bring it closer to the point where physical memory is overloaded and new requests cause current requests to page out to disk.
Static file caching is a core function of NGINX. You can implement it on a web server or a reverse proxy server:
- On an NGINX web server, static file caching offloads the application server; files are retrieved faster and with much less memory overhead. However, file retrieval is still being driven off the same physical server or virtual server instance, so the server’s processor is still forced to deal with tasks other than running your application.
- An NGINX reverse proxy server runs on a different machine or instance from the web server, so its caching of static files consumes no resource on application servers. The application server can focus exclusively on running your application.
There are three overall steps to implementing static file caching on NGINX:
- Specifying the root directory for searches.
- Processing requests.
- Optimizing response speed.
On an NGINX web server, with no reverse proxy server involved, you don’t cache in the usual sense. You simply redirect inquiries for static files to the web server, using the X-Accel-Redirect header. The application server never sees the request and can devote all its resources to application requests. With a reverse proxy server, you do use static file caching – and the physical server or virtual server instance that runs the application doesn’t have any part in answering the static file requests.
As an example of optimizing response speed, the following configuration snippet enables NGINX to use the operating system’s sendfile system call, which saves a step in file transmission by not copying the file to an intermediate buffer:
location /mp3 {
    sendfile           on;
    sendfile_max_chunk 1m;
    # ...
}
For specifics on configuring NGINX for static file caching, see the NGINX Plus Admin Guide.
Tip 5 – Implement Microcaching
Microcaching, confusingly, goes by many names, which also include application caching and just plain caching. Here at NGINX, we use the term microcaching to emphasize the brief time such files are valid.
Let’s say that you have a blog post page that provides a mechanism for user comments. You want to include the latest and greatest comments anytime a new visitor arrives at the page – or anytime existing users refresh the page to see their own, or someone else’s, new comment. In this case, it seems like a good idea to generate the page anew every time anyone visits it.
However, “every time” can become burdensome. If a page is getting one visit per second, generating it anew for every visit makes sense. But if the page is getting ten, or a hundred, or a thousand visits per second, along with all the other pages on the site, the application server can get overloaded. Meeting the goal of serving people fresh content means no one gets any content quickly.
Microcaching means generating a page once marking the cached version as valid for a brief period of time – say, one or a few seconds. When the cached version expires, the next request prompts generation of a fresh page, and requests right after get its cached version. This is the same behavior as for a static file, but on much shorter timeframes.
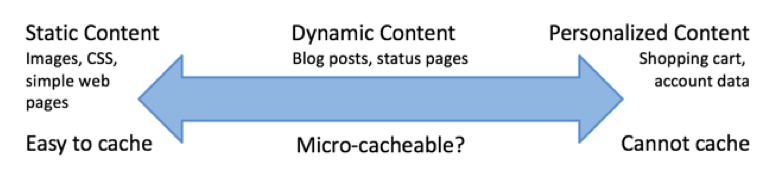
This image indicates where to look on your site for content that you can microcache. It’s from a microcaching blog post by our own Owen Garrett.
Microcaching is awesome because it removes work from the application server just when that is what’s needed most, and with very little to no detriment to the user. It’s so awesome that it’s built into some systems. Drupal considers its robust, built‑in microcaching capabilities so essential that, in Drupal world, microcaching is simply called “caching”.
But the Drupal solution is a bit lacking, and so is any similar solution. The application server does less work, but it’s still Drupal (or, more generally, PHP) that’s having to manage the configuration, implementation, and file serving. By using NGINX for microcaching, the application server is totally offloaded from anything except generating a fresh page at whatever frequency is specified by the microcache. It doesn’t even see the other requests, let alone have to store or retrieve anything for cache hits.
Using NGINX Plus, or other tools, you can monitor your site and see which pages will benefit from microcaching. The following configuration snippet implements a 1‑second caching period for responses with a 200 OK status code.
proxy_cache_path /tmp/cache keys_zone=cache:10m levels=1:2 inactive=600s max_size=100m;
server {
    proxy_cache cache;
    proxy_cache_valid 200 1s;
    # ...
}
Conclusion to Part 1
This first part of our PHP blog post is focused on single‑server solutions, plus caching, which is effective in single‑server implementations – but even more so when a reverse proxy server is in the mix. Part 2 describes the benefits of a reverse proxy server, multiserver implementation around your PHP application.
To try NGINX Plus, start your free 30-day trial today or contact us for a live demo.