You may not realize it, but your website is under constant threat. If it’s running WordPress, there will be bots trying to spam you. If it has a login page, there will be brute‑force password attacks. You may also consider search engine spiders as unwanted visitors.
Defending your site from unwanted, suspicious, and malicious activity is no easy task. A web application firewall, such as the NGINX WAF (which is powered by ModSecurity) or Wallarm (available as an NGINX Plus Certified Module), is an effective tool and should be considered as part of your security stack. For most environments, there’s no such thing as too much security, and a multi‑layered approach is invariably the most effective.
In this blog post, we’ll discuss the use of fail2ban as another layer of the web security stack. Fail2ban is an intrusion detection system (IDS) which continually monitors log files for suspicious activity, and then takes one or more preconfigured actions. Typically fail2ban monitors for failed login attempts and then blocks (bans) the offending IP address for a period of time. This is a simple yet effective defense against brute‑force password attacks.
In NGINX Plus R13, we introduced a native key‑value store and a new NGINX Plus API. This allows for a wealth of on‑the‑fly reconfiguration solutions in which NGINX Plus configuration and behavior can be driven by an external system. In this blog post, we’ll also show how fail2ban can be used to automatically reconfigure NGINX Plus to ignore requests from IP addresses that have caused multiple failed authentication events.
Using a Key‑Value Store for IP Blacklisting
The NGINX Plus key‑value store is a native, in‑memory store with three primary characteristics:
- Key‑value pairs are represented as JSON objects
- Key‑value pairs are managed entirely through an API
- The values are available to NGINX Plus as regular configuration variables
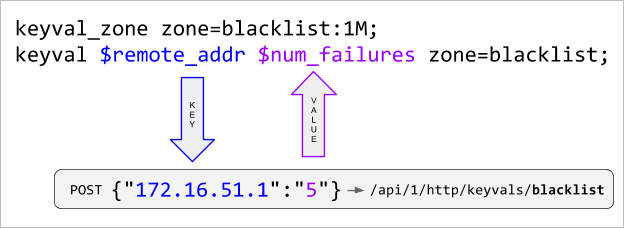
The key‑value store is defined by creating a shared memory zone named by the keyval_zone directive. This key‑value store can then be populated with an initial set of values by using the HTTP POST method to submit a JSON object to the API. The keyval directive then defines which existing variable will be used as the lookup key ($remote_addr in the example), and the name of a new variable ($num_failures) that will be evaluated from that key’s corresponding value.
The API is enabled by designating a location block as the NGINX Plus API endpoint.
Before we add key‑value pairs to it, a request for the contents of the blacklist store returns an empty JSON object.
$ curl http://localhost:1111/api/1/http/keyvals/blacklist
{}
The key‑value store can now be populated with an initial key‑value pair using the HTTP POST method (in the form of the -d argument to the curl command) to submit a new JSON object. Multiple key‑value pairs can be POST‑ed to an empty key‑value store and singularly thereafter.
$ curl -id '{"10.0.0.1":"1"}' http://localhost:1111/api/1/http/keyvals/blacklist
HTTP/1.1 201 Created
...
A key‑value pair is removed by PATCH‑ing the key with a value of null.
$ curl -iX PATCH -d '{"10.0.0.1":null}' http://localhost:1111/api/1/http/keyvals/blacklist
HTTP/1.1 204 No Content
...
All key‑value pairs can be removed from the key‑value store by sending the DELETE method.
$ curl -iX DELETE http://localhost:1111/api/1/http/keyvals/blacklist
HTTP/1.1 204 No Content
...
A simple implementation of IP blacklisting can now be configured.
This configuration snippet configures port 80 as a web server. Line 18 evaluates the $num_failures variable to the value part of the key‑value pair in the blacklist shared memory zone that matches the key that corresponds to the $remote_addr variable (client IP address). This process of evaluating $num_failures is more clearly expressed sequentially:
- Pass the value of
$remote_addrto the blacklist key‑value store - If
$remote_addris an exact match for a key then obtain the value of that key‑value pair - Return the value as
$num_failures
And so, if the client IP address has been POST‑ed to the key‑value store then all requests will result in an HTTP 403 Forbidden error. The advantage of this approach, as opposed to using a map block for the same purpose, is that the IP blacklist can be controlled by an external system.
Using fail2ban to Dynamically Manage the IP Blacklist
As mentioned above, fail2ban is commonly used to detect suspicious and/or malicious activity in log files, and then take action to protect the system. The default action is to configure iptables to drop all packets originating from the IP address that was logged. This approach, although effective in blocking a malicious actor, provides a very poor user experience for genuine users, especially if they’ve forgotten their password. To these users, it appears as if the website is simply unavailable.
The following configuration describes a fail2ban action that submits the offending IP address to the NGINX Plus blacklist key‑value store. NGINX Plus then displays a more helpful error page and simultaneously applies a request rate limit to that IP address so that if the actions are part of an attack, then that attack is effectively neutralized.
We assume a default installation of fail2ban on the same host as NGINX Plus, with all configuration under the /etc/fail2ban directory.
The following fail2ban action uses the NGINX Plus API to add and remove “banned” IP addresses within the blacklist key‑value store in the same way as our simple example above. We place the nginx-plus-blacklist.conf file in the /etc/fail2ban/action.d directory.
The following fail2ban jail enables the built‑in filter that detects failed login attempts using NGINX’s HTTP Basic Authentication module and applies the action defined in nginx-plus-blacklist.conf. Many other built‑in filters are available, and can be easily created to detect unwanted activity in NGINX access logs.
The following NGINX Plus configuration snippet applies HTTP Basic authentication to the default “Welcome to NGINX” page. We place the password_site.conf file in the /etc/nginx/conf.d directory.
Line 11 defines the keyval_zone as in blacklist_keyval.conf above, but with the addition of the state parameter, which specifies a file where the state of the key‑value store is stored and so persists when NGINX Plus is stopped and restarted. The key‑value store persists across regular configuration reloads without specifying a state file. (Lines 1–10 are not shown, but are the same as blacklist_keyval.conf.)
Line 14 creates a shared memory zone called 20permin and specifies a maximum request rate of 20 requests per minute for each client IP address. This rate limit is then applied when an IP address is added to the blacklist by fail2ban (line 30).
The server block defines a web server listening on the default port (80), where all requests are matched by the location / block (line 20). The root directive (line 18) specifies where our web content resides. Lines 21–22 specify that HTTP Basic authentication is required for this site and that the database of passwords for authorized users is in the file users.htpasswd. The documentation for the auth_basic_user_file directive describes the format of that file. Note that this configuration is unencrypted for testing purposes and any production web site using HTTP Basic authentication should use SSL/TLS for transport security.
When the client IP address has been blacklisted (lines 24–26), instead of returning the HTTP 403 error code, we rewrite the request to be /banned.html which is then processed in the location block that exactly matches that URI (line 29). This returns a static web page that explains that the user’s IP address has been blocked due to excessive login failures. It also applies a restrictive rate limit (line 30) that prevents a malicious client from unnecessarily consuming system resources.
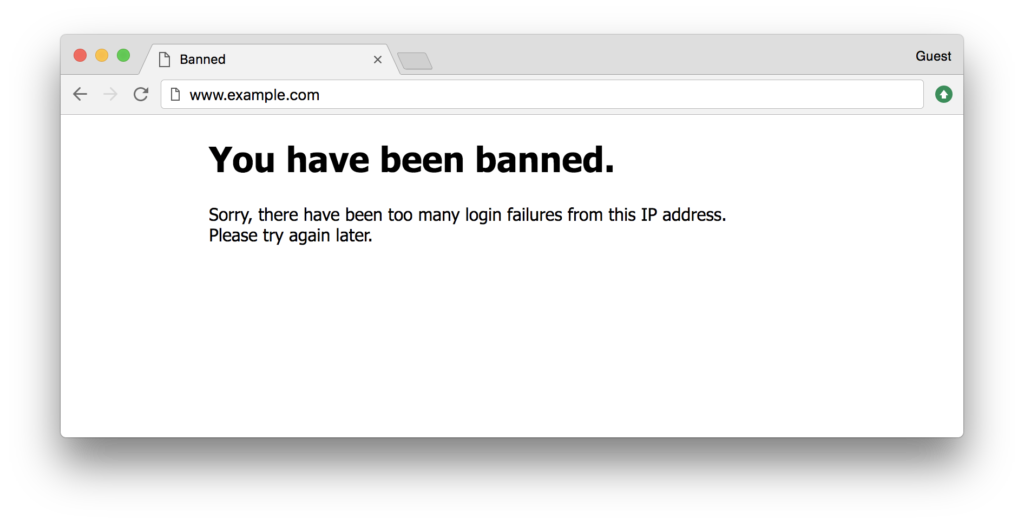
(The HTML for this sample web page is available as banned.html in the GitHub repository for this post.)
We can simulate successive failed login attempts and the corresponding fail2ban activity as follows.
$ curl -i http://admin:password@www.example.com/
HTTP/1.1 401 Unauthorized ...
$ curl -i http://admin:admin@www.example.com/
HTTP/1.1 401 Unauthorized ...
$ curl -i http://admin:pass1234@www.example.com/
HTTP/1.1 401 Unauthorized ...
$ curl -i http://admin:letmein@www.example.com/
HTTP/1.1 401 Unauthorized ...
$ curl -i http://admin:fred@www.example.com/
HTTP/1.1 401 Unauthorized ...
$ curl  http://admin:P@ssw0rd@www.example.com/
<!DOCTYPE html>
<html>
<head>
<title>Banned</title>
...
$ tail -f /var/log/fail2ban.log
2017-08-17 13:55:18,903 fail2ban.filter   [28498]: INFO    [nginx-http-auth] Found 172.16.52.1
2017-08-17 13:55:28,836 fail2ban.filter   [28498]: INFO    [nginx-http-auth] Found 172.16.52.1
2017-08-17 13:57:49,228 fail2ban.filter   [28498]: INFO    [nginx-http-auth] Found 172.16.52.1
2017-08-17 13:57:50,286 fail2ban.filter   [28498]: INFO    [nginx-http-auth] Found 172.16.52.1
2017-08-17 13:57:52,015 fail2ban.filter   [28498]: INFO    [nginx-http-auth] Found 172.16.52.1
2017-08-17 13:57:52,088 fail2ban.actions  [28498]: NOTICE  [nginx-http-auth] Ban 172.16.52.1
2017-08-17 13:59:52,379 fail2ban.actions  [28498]: NOTICE  [nginx-http-auth] Unban 172.16.52.1
This dynamic IP blacklisting solution can now run without any further configuration changes. Fail2ban watches the NGINX log files and adds banned IP addresses to the NGINX Plus key‑value store using the API. After 120 seconds (the bantime configured in jail.local), the offending IP address is removed from the blacklist, again using the NGINX Plus API, and login attempts are once more accepted from that address.
The NGINX Plus API and key‑value store make this type of integration possible. Advanced configuration solutions can now be achieved without requiring the construction of NGINX Plus configuration files and performing reloads. We’d love to hear about how you’re using these features to create your own on‑the‑fly configuration solutions. Please add a comment below.
To try NGINX Plus, start your free 30-day trial today or contact us for a demo.