We’ve written a lot about how you can use NGINX Plus and the open source NGINX software to load balance your websites and apps for optimal availability and reliability. Load balancing is a fundamental tool for boosting app performance, delivering apps at scale, and deploying containers and microservices.
We’ve previously explained how you can deploy NGINX Plus in the data center (perhaps alongside legacy application delivery controllers), in containers, and in cloud environments, including Amazon Web Services, the Google Cloud Platform, and Microsoft Azure.
In this post, we’ll focus on the load‑balancing techniques (also called load‑balancing methods or algorithms) in NGINX Plus and NGINX, offering some advice on how to choose the right method for different use cases. NGINX provides four load‑balancing techniques (Round Robin, Hash, IP Hash, and Least Connections), and NGINX Plus adds one more (Least Time). All methods for HTTP traffic are also available for TCP (and UDP, in NGINX Plus Release 9 and later), except IP Hash.
Reviewing the Load‑Balancing Techniques
We’ll assume you know the basics of how to configure load balancing, but you can check out these resources if you’d like a refresher:
- Load Balancing in the NGINX Plus Admin Guide provides a complete overview.
- Application Load Balancing with NGINX Plus links to detailed discussions of enhanced features in NGINX Plus that can improve the efficiency of a load‑balancing method even more.
- Load Balancing with NGINX and NGINX Plus, Part 1 and Part 2 is a walk-through that builds a simple reverse proxy into a comprehensive load‑balancing solution with NGINX Plus’ enhanced features.
- The Load Balancing Solutions page links to other resources, including ebooks, webinars, and whitepapers.
For simplicity’s sake, we’ll focus on HTTP load balancing, which you configure in the http context. TCP load balancing is configured in the stream context instead (as is UDP load balancing in NGINX Plus Release 9 and later). Although the HTTP and TCP/UDP load balancers have feature parity, the available directives and parameters differ somewhat because of inherent differences between the protocols; for details, see the documentation about the Upstream modules for HTTP and TCP/UDP.
You enable load balancing with two configuration blocks, which we’ll show in their basic form, without optional parameters or any auxiliary features:
-
The
serverblock defines a virtual server that listens for traffic with the characteristics you define, and proxies it to a named group of upstream servers. In our examples, the virtual server listens on the default port (80) for the HTTP traffic sent to www.example.com, and proxies it to the upstream server group called backend. This block is the same in all our examples.server { server_name www.example.com; location / { proxy_pass http://backend; } }(NGINX Plus and NGINX can also load balance FastCGI, memcached, SCGI, and uwsgi backend servers. Replace
proxy_passwith the appropriate directive –fastcgi_pass,memcached_pass,scgi_pass, oruwsgi_pass.) -
The
upstreamblock names an upstream group and lists the servers that belong to it, identified by hostname, IP address, or UNIX‑domain socket path. In our examples, the upstream group called backend includes three servers: web1, web2, and web3.The
upstreamblock is where you specify the load‑balancing technique, so we’ll be highlighting that in the sections that follow. As an example, here’s the block for the default method, Round Robin:upstream backend { server web1; server web2; server web3; }
Round Robin
Round Robin is the default load‑balancing technique for both NGINX Plus and NGINX. The load balancer runs through the list of upstream servers in sequence, assigning the next connection request to each one in turn.
Given the following sample configuration of the backend upstream group, the load balancer sends the first three connection requests to web1, web2, and web3 in order, the fourth to web1, the fifth to web2, and so on.
upstream backend {
server web1;
server web2;
server web3;
}
server {
    server_name www.example.com;

    location / {
       proxy_pass http://backend;
    }
}Hash
With the Hash method, for each request the load balancer calculates a hash that is based on the combination of text and NGINX variables you specify, and associates the hash with one of the servers. It sends all requests with that hash to that server, so this method establishes a basic kind of session persistence.
In the following example, the hash directive uses the scheme (http or https) and full URI of the request as the basis for the hash:
upstream backend {
    hash $scheme$request_uri;

    server web1;
    server web2;
    server web3;
}

server {
    server_name www.example.com;

    location / {
       proxy_pass http://backend;
    }
}
IP Hash
IP Hash (available for HTTP only) is a predefined variant of the Hash method, in which the hash is based on the client’s IP address. You set it with the ip_hash directive.
upstream backend {
    ip_hash;

    server web1;
    server web2;
    server web3;
}

server {
    server_name www.example.com;

    location / {
       proxy_pass http://backend;
    }
}
If the client has an IPv6 address, the hash is based on the entire address. If it has an IPv4 address, the hash is based on just the first three octets of the address. This is designed to optimize for ISP clients that are assigned IP addresses dynamically from a subnetwork (/24) range. In case of reboot or reconnection, the client’s address often changes to a different one in the /24 network range, but the connection still represents the same client, so there’s no reason to change the mapping to the server.
If, however, the majority of the traffic to your site is coming from clients on the same /24 network, IP Hash doesn’t make sense because it maps all clients to the same server. In that case (or if you want to hash on all four octets for another reason), instead use the Hash method with the $remote_addr variable.
hash $remote_addr;Least Connections
With the Least Connections method, the load balancer compares the current number of active connections it has to each server, and sends the request to the server with the fewest connections. You configure it with the least_conn directive.
upstream backend {
    least_conn;

    server web1;
    server web2;
    server web3;
}

server {
    server_name www.example.com;

    location / {
       proxy_pass http://backend;
    }
}
Least Time
With the Least Time method (available in NGINX Plus only), the load balancer mathematically combines two metrics for each server – the current number of active connections and a weighted average response time for past requests – and sends the request to the server with the lowest value.
Your choice of parameter on the least_time directive controls which of two response times is tracked: either the time to receive the response header (header) or the time to receive the full response (last_byte).
upstream backend {
    least_time (header | last_byte);

    server web1;
    server web2;
    server web3;
}

server {
    server_name www.example.com;

    location / {
       proxy_pass http://backend;
    }
}
Note: For TCP and UDP load balancing (in the stream context), you can choose from three types of response time with these parameters to the least_time directive:
connect– Time to connect to the upstream serverfirst_byte– Time to receive the first byte of response datalast_byte– Time to receive the last byte of response data
Choosing a Load‑Balancing Technique
So how do you know which of the load‑balancing techniques is best for your website or app?
Traffic patterns vary so much from site to site – and even within a single site at different times of day – that it doesn’t make sense to base the choice of load‑balancing technique on a single characteristic (such as bursty traffic vs. steady, short‑lived connections vs. long‑lived, and so on). That said, we’ll consider pros and cons of each method to help you narrow the range of choices to consider.
Running Tests to Compare Methods
Whichever subset of load‑balancing methods you consider, we encourage you to test them to see which works best for your traffic. “Best” usually means shortest time to deliver responses to clients, but you might have different criteria.
Application performance management tools are very handy for this kind of testing – you can create custom screens with graphs for each of the servers in the upstream group, making it possible to compare them in real time as values change during the test. Several APMs offer custom plug-ins for NGINX Plus and NGINX, including AppDynamics, Datadog, Dynatrace, and New Relic.
Testing is most straightforward if all servers have the same capacity. If not, you need to set server weights so that machines with more capacity receive more requests. See Setting Weights When Servers Aren’t Identical below.
Some metrics to check during testing are:
- CPU and memory load – Look at the percentage of total capacity used, for both CPU and memory. If all servers aren’t equally loaded, traffic is not being distributed efficiently.
- Server response time – If the time is consistently higher for some servers than others, somehow “heavier” requests (requiring more computation or calls to a database or other services) are getting directed to them in an unbalanced way. Try adjusting the weights, because the imbalance might be caused by incorrect weights rather than by a problem with the load‑balancing technique.
- Total time to respond to the client – Again, consistently higher times for some servers suggest they’re getting a disproportionate share of time‑consuming requests. And again, you can try adjusting weights to see if that eliminates the issue.
- Errors and failed requests – You need to make sure that the number of failed requests and other errors during the tests is not larger than is usual for your site. Otherwise you’re basing your decision on error conditions instead of realistic traffic. For some errors, the server can send its response more quickly than when the request succeeds. For HTTP response code
404(FileNotFound), for example, the server probably returns the error much more quickly than it could deliver the actual file if it existed. With the Least Connections and Least Time load‑balancing algorithms, this can lead the load balancer to favor a server that is actually not working well.
Pros, Cons, and Use Cases
So now let’s look at benefits and drawbacks of each load‑balancing technique, and describe some use cases for which they’re particularly suited. We’ll discuss them in order of increasing suitability for the majority of use cases. As a quick preview: we consider Least Connections (and, for NGINX Plus, Least Time) to be the best choices for the widest range of use cases.
Hash and IP Hash
The Hash and IP Hash load‑balancing techniques create a fixed association between a given type of client request (captured in the hash value) and a certain server. You might recognize this as session persistence
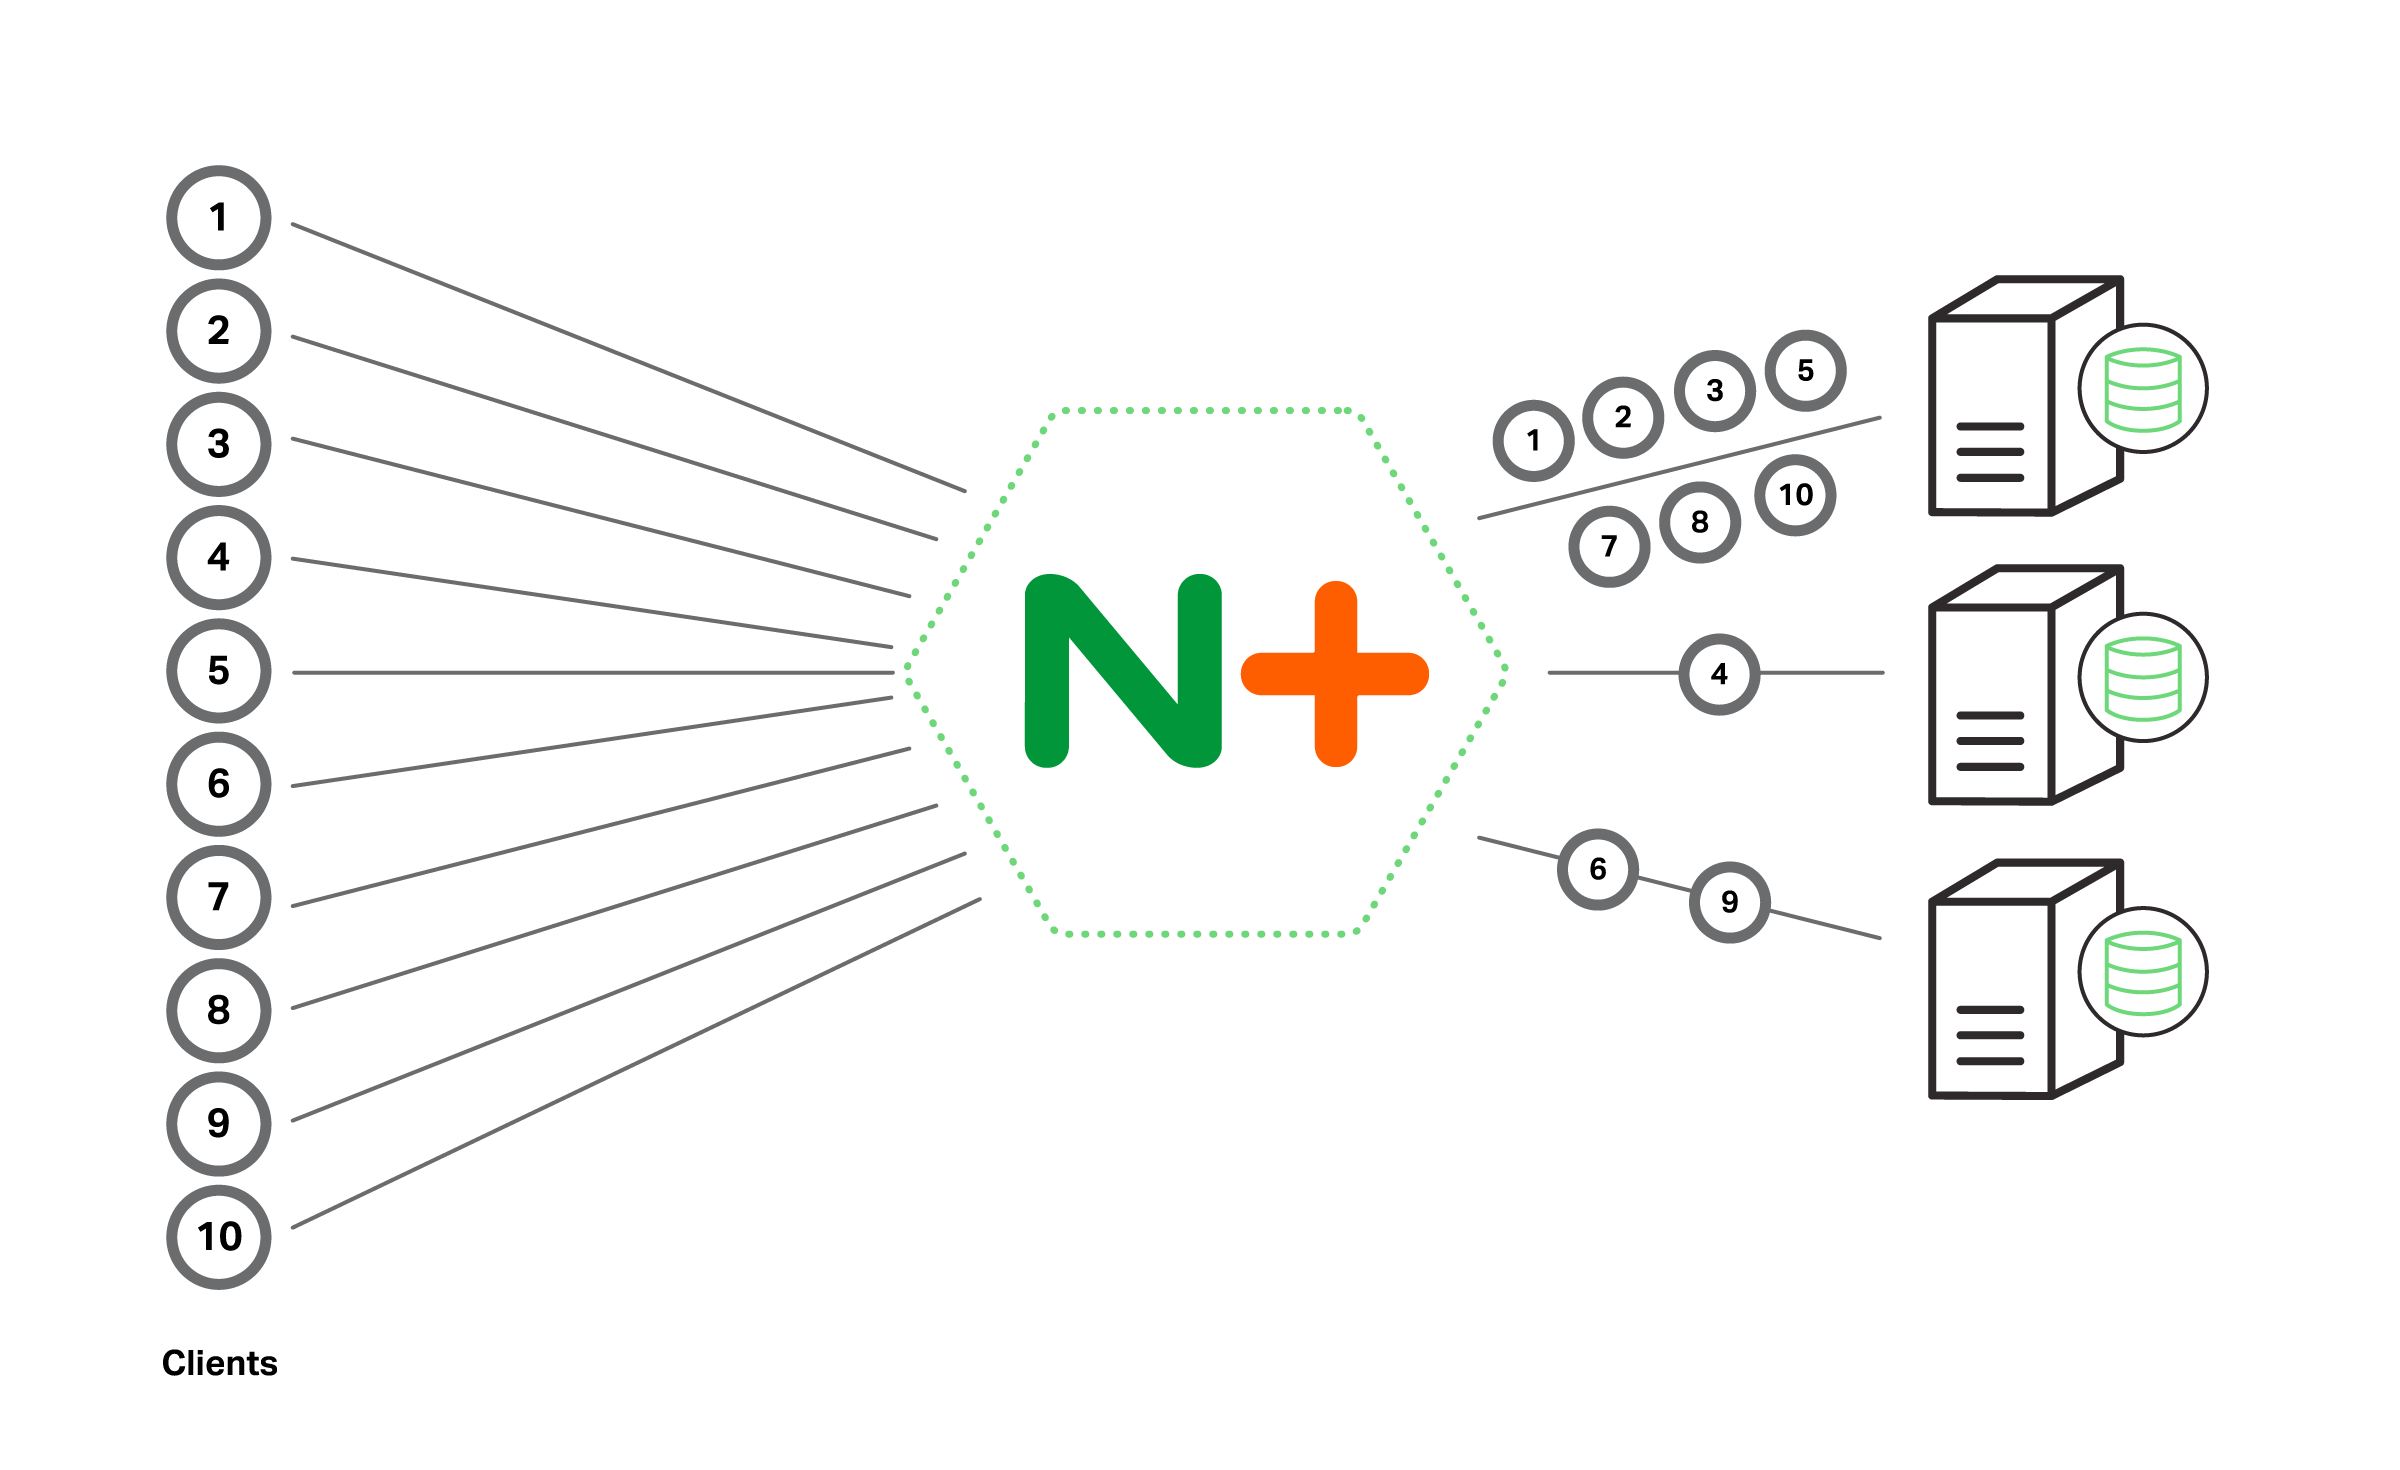
The biggest drawback of these methods is that they are not guaranteed to distribute requests in equal numbers across servers, let alone balance load evenly. The hashing algorithm evenly divides the set of all possible hash values into “buckets”, one for each server in the upstream group, but there’s no way to predict whether the requests that actually occur will have hashes that are evenly distributed. Suppose, for example, that ten clients are accessing a site, and the IP Hash algorithm happens to associate the hash for seven of the IP addresses with web1, one with web2, and two with web3. The web1 server ends up receiving more than twice as many requests as the other servers combined.
So it makes sense to use Hash or IP Hash when the benefit of maintaining sessions outweighs the possibly bad effects of unbalanced load. They are the only form of session persistence available in NGINX. NGINX Plus provides three other session persistence mechanisms that are more sophisticated and work in combination with actual load balancing (you configure them with the sticky directive). But you might choose Hash or IP Hash even with NGINX Plus, because the three mechanisms don’t work in the following cases:
-
The browser or client app doesn’t accept cookies, and the application does not have a way to work with the session‑persistence mechanisms without cookies. Use the IP Hash method to associate each client (specifically its IP address) with a particular server.
-
You want to send requests for a given URL to the same server every time, to take advantage of caching on the server itself. Use the Hash method with the
$request_urivariable to fetch the file from the same server every time.For example, suppose you know that serving a certain .php file requires several time‑consuming database calls, but the fetched data doesn’t change often and so is cacheable. If you direct all requests for the file to the same server, only the first client experiences a long delay because of the database calls. For all subsequent clients, the data is quickly retrieved from the cache. Another advantage is that only the one server has to cache that particular set of data. Because you don’t end up duplicate‑caching the same data on every server, you can use smaller caches.
There are a couple cases where IP Hash – and Hash when the client IP address is in the key – don’t work:
- When the client’s IP address can change during the session, for example when a mobile client switches from a WiFi network to a cellular one.
- When the requests from a large number of clients are passing through a forward proxy, because the proxy’s IP address is used for all of them.
Hashes are deterministic (the hashing algorithm yields the same results every time). This has a couple of positive side effects: all NGINX Plus or NGINX instances in a deployment load balance requests in exactly the same way, and the hash‑to‑server mapping persists across restarts of the load balancer. (It’s actually recalculated after the restart, but because the result is always the same it effectively persists.)
On the other hand, changing the set of upstream servers usually forces recalculation of at least some of the mappings, breaking session persistence. You can reduce the number of recalculated mappings somewhat:
- For the Hash method, include the
consistentparameter to thehashdirective; NGINX Plus uses the ketama hashing algorithm, which results in less remapping. -
For the IP Hash method, before removing a server from the upstream group temporarily, add the
downparameter to itsserverdirective, as for web2 in the following example. The mappings are not recalculated, on the assumption that the server will soon return to service.upstream backend { ip_hash; server web1; server web2 down; server web3; }
Round Robin
As noted previously, Round Robin is the default load‑balancing method in NGINX Plus and NGINX. That certainly makes it the easiest method to choose – you don’t have to configure anything beyond the upstream group itself.
The general consensus is that Round Robin works best when the characteristics of the servers and requests are unlikely to cause some servers to become overloaded relative to others. Some of the conditions are:
- All the servers have about the same capacity. This requirement is less important if differences between servers are accurately represented by server weights.
- All the servers host the same content.
- Requests are pretty similar in the amount of time or processing power they require. If there’s a wide variation in request weight, a server can become overloaded because the load balancer happens to send it a lot of heavyweight requests in quick succession.
- Traffic volume is not heavy enough to push servers to near full capacity very often. If servers are already heavily loaded, it’s more likely that Round Robin’s rote distribution of requests will push some servers “over the edge” into overload as described in the previous bullet.
Round Robin is particularly suitable for testing scenarios, because it ensures that requests are distributed across all servers and in equal numbers (or the appropriately weighted proportion). Some other methods don’t always distribute traffic evenly when volume is low, which can skew test results.
The even nature of the distribution can also reveal whether caches are working well and at full capacity: because there’s no way with Round Robin to send requests for a given file to the same server, every server is likely to end up serving and caching a wide range of files (and usually many of the same files as its peers), which makes the cache more likely to fill.
Finally, the even initial distribution helps uncover issues with session persistence in NGINX Plus (as configured with the sticky directive).
Least Connections and Least Time
As we mentioned above, Least Connections is the most suitable load‑balancing technique for the widest range of use cases, and particularly for production traffic. This is supported by anecdotal evidence from our customers. Its performance is stable and predictable.
Least Connections also effectively distributes workload across servers according to their capacity. A more powerful server fulfills requests more quickly, so at any given moment it’s likely to have a smaller number of connections still being processed (or even waiting for processing to start) than a server with less capacity. Least Connections sends each request to the server with the smallest number of current connections, and so is more likely to send requests to powerful servers. (Setting weights still results in even more efficient distribution of requests, however, as described in Setting Weights When Servers Aren’t Identical below.)
You can consider Least Time (NGINX Plus only) a more sensitive version of Least Connections. By including the average response time, it takes into account the server’s recent performance history (it’s actually an exponentially weighted moving average, so older response times influence the average less than more recent response times).
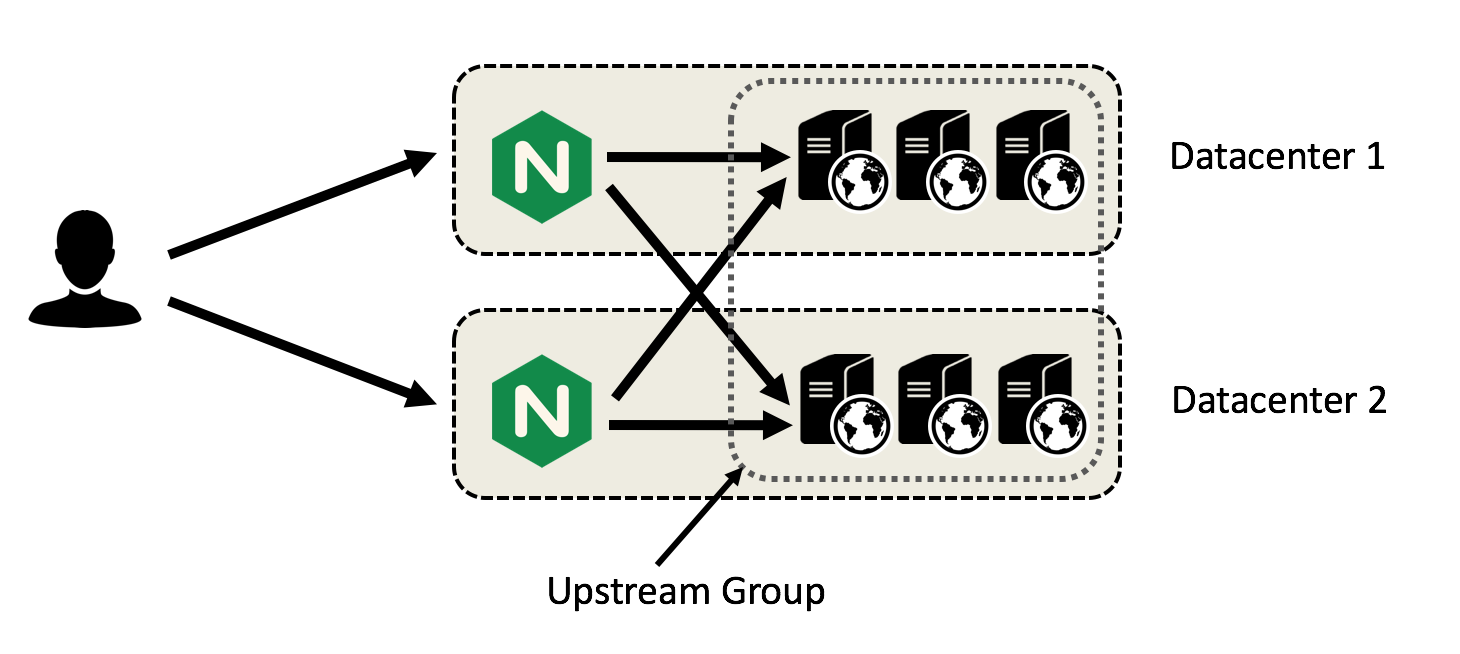
Least Time is particularly suitable when the upstream servers have very different average response times. If, for example, you have servers in different data centers for purposes of disaster recovery, Least Time tends to send more requests to the local servers because they respond faster. Another use case is cloud environments, where server performance is often very unpredictable.
Setting Weights When Servers Aren’t Identical
We’ve mentioned several times the importance of setting server weights when the servers in the upstream group have different capacities. It’s particularly important for the Round Robin load balancer, which otherwise sends the same number of requests to each server. That’s likely to result in a less powerful server being overloaded while a more powerful one sits partly idle.
To set weights, include the weight parameter on one or more server directives in the upstream block. The default value is 1.
You can think about the effect of setting weights for the different load‑balancing techniques in the following way. Keep in mind that the descriptions are conceptually correct, but the implementation in the NGINX Plus code doesn’t necessarily use the indicated mathematical operations. Here’s the upstream group for our examples:
upstream backend {
    server web1 weight=6;
    server web2 weight=3;
    server web3;
}-
Round Robin – Each server gets the percentage of the incoming requests equal to its weight divided by the sum of the weights. In our example, out of every ten requests web1 gets six (60%), web2 gets three (30%), and web3 gets one (10%).
-
Hash and IP Hash – Recall that without weights the hashing algorithm evenly divides the set of all possible hash values into “buckets”, one for each server in the upstream group. With weights, it instead sums the weights, divides the set of possible hashes among that number of buckets, and associates each server with the number of buckets equivalent to its weight.
In our example, there are ten buckets, each with 10% of the possible hashes in it. Six buckets (60% of the possible hashes) are associated with web1, three buckets (30%) with web2, and one bucket (10%) with web3.
-
Least Connections and Least Time – We mentioned previously that even without weights these algorithms are pretty effective at distributing workload across servers according to their capacity. Setting weights improves their performance in this regard even more.
Recall that Least Connections and Least Time send each request to the server with the lowest “score” (number of connections, or a mathematical combination of connections and time, respectively). When you assign weights, the load balancer divides each server’s score by its weight, and again sends the request to the server with the lowest value.
Here’s an example for Least Connections with our sample weights and the indicated number of active connections: web1‘s score of 100 is lowest and it gets the request even though its connection count of 600 is 1.5 times web2‘s and more than 4 times web3‘s.
- web1 – 600 active connections ÷ 6 = 100
- web2 – 400 active connections ÷ 3 = 133
- web3 – 125 active connections ÷ 1 = 125
Summary
After reviewing the pros and cons of the load‑balancing techniques available in NGINX Plus and NGINX, we consider Least Connections (and, for NGINX Plus, Least Time) to be most suitable for the widest range of use cases. But it’s important for you to test several methods in your deployment, because its unique combination of traffic and server characteristics might make another method better for you.
To try NGINX Plus load balancing yourself, start your free 30-day trial today or contact us for a live demo.
We’d love to hear about your experiences with load balancing in different use cases. Please add them to the comments section below.